Subscribe to the Quilt Blocks Digest newsletter for updates, special offers & exclusive content!
- Home
- Quilt Patterns
- Easy Quilt Pattern
Easy Quilt Pattern
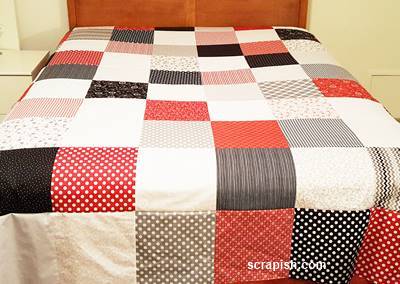
An easy quilt pattern made from a simple square - what could be easier? How about using precut 10 inch squares. Beginners rejoice!
The simple square - one of the easiest blocks used to make a quilt.
This pattern is made even easier by using 10 inch precuts to make the entire quilt top - no cutting of strips or piecing blocks required.
Now that's beginner friendly!
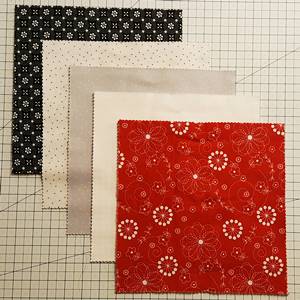
10 inch precuts come packaged already cut into squares ready for sewing.
There are usually 40 or 42 squares per stack, representing an entire fabric line. Some prints are repeated.
Block Name: Square
Finished Block Size: 9.5 inch
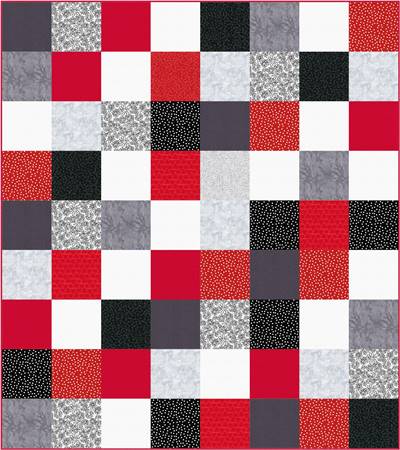
Approximate Finished Quilt Size: 76 x 95 inches; 8 x 10 blocks
Fabrics for Quilt Top
For a queen size quilt you will need 2 packs 10 inch precuts, or 80 (10 inch squares), in your favorite color scheme.
I have chosen a red, black, grey and white color scheme.
 2 (10 inch) precut squares or layer cakes (R)
Backing, Binding, Batting Fabrics
Backing: 3 yards of 108 inch wide backing fabric
Binding Fabric: 3/4 yards
Batting: queen size (cut 80 inches X 99 inches)
Easy Quilt Pattern Instructions
- All seams are 1/4 inch unless otherwise noted.
- WOF = width of fabric
Quilt Top Layout
This quilt pattern is laid out in an 8 row x 10 column grid - that's 80 (10 inch) squares.

Step 1 Separate squares
Separate the squares from one of the 10 inch square stacks into color groups.

Step 2 Arrange Squares
We are going to put the quilt top together from two panels - half of the pattern at a time.
On a design wall or other space arrange squares from one of the 10 inch square stacks in an eye pleasing grid of 8 rows x 5 columns (Panel 1).
First, layout row 1. Then layout the squares of successive rows ensuring the each color is sprinkled throughout the panel in relation to the previous row.

Step 3 Stack Squares
Stack each row of squares for easy transport to your sewing area. Write the row number on a piece of paper and pin it to the stack.
Take the blocks off the design wall in the correct order of placement. Simply start with row 1, square 1. Place square 1 on top of square 2, square 2 on top of square 3, and so on through to square 8.

How to Sew Blocks of a Row Together
Step 4 Sew Squares of Each Row
Row 1: Sew the squares of Row 1 together. Next to your sewing machine, place Square 1 face up. Place Square 2 face down over Square 1.

Sew a 1/4 inch seam along the right edge of the two squares.
Flip Square 2 face up. Place Square 3 face down over Square 2. Sew a 1/4 inch seam along the right edge of the two squares.
Continue in this way through all the squares (or blocks) of the row.
Press seams towards the right.

Note: Pin the row label near the upper left corner of square
1. Leave this label pinned while you make the quilt top. It let's you
know how to orient the quilt top.
Sew Rows 2 - 5: In turn, stitch the squares of Rows 2 through 5, pressing each row in the opposite direction from the previous row.
How to Sew Rows Together
Step 5 Stitch Rows Together
With right sides together stitch Row 2 to Row 1. Place Row 1 right side up. Place Row 2 face down on top of Row 1, nesting the seams. Place a pin on both sides of each seam and along the row in the middle of each square.
Sew the rows together using a 1/4 inch seam.
Repeat for next three rows, placing the next row with right side down over previous row.

Step 6 Stitch Panel 2
Repeat Steps 1 through 5 to make a second panel. Press the first row of Panel 2 in the opposite direction of the last row of Panel 1, then press each row in the opposite direction from the previous row.
Pressing Direction
Below see the pressing direction of the blocks of Rows 1 - 10 and the seams between the rows.

Step 7 Stitch Panels Together
With right sides together, place Panel 2 on top of Panel 1. (The top of Panel 2, Row 1 should meet the bottom of Panel 1, Row 5.)
Attach the panels by stitching this final seam.
Quilt Top Complete
Now you have a completed quilt top.

Finishing the Quilt
Batting
Batting: queen size (trim to 80 inches X 99 inches)
Backing
Backing: 3 yards of 108 inch wide backing fabric
Three yards of 108 inch wide fabric is 108 x 108 inches. Trim it to 84 X 104 inches to back the quilt.
Yes, you will have left over fabric, but this is much easier than buying yardage, cutting it and then piecing it to size.
Make the Quilt Sandwich
Put the quilt sandwich together by layering it in this order: backing, batting and quilt top. Pin baste the three layers together.
Quilt the Quilt
Now quilt the three layers in your favorite quilting design.
Bind the Quilt
Binding Fabric: 3/4 yards
From the yardage cut 9 (2 1/2 x 40 inch) strips and join to make a single long binding strip. (This pattern assumes you know how to bind, but binding instructions will be posted to the site at a later time.)
Easy Quilt Pattern Complete
This is an easy quilt pattern which you can adapt to your favorite color scheme.
Here are some popular color schemes:
- red, white, blue
- yellow, green, black, brown
- orange, shades of green, grey
- pink and grey
- yellow, blue, white, black
Raid your stash to make this easy quilt pattern truly your own.
Subscribe to the Quilt Blocks Digest newsletter for updates, special offers & exclusive content!
You will receive an email asking you to confirm your consent to subscribe. You must click on the confirmation link contained in that email in order to be subscribed and receive emails.
Your email address is never shared. Unsubscribe any time.


