Subscribe to the Quilt Blocks Digest newsletter for updates, special offers & exclusive content!
- Home
- How to Quilt
- Half Square Triangles
Half Square Triangles Tutorial
Half square triangles (HSTs) are used in many quilt block patterns. They expand your design options. Make your quilting dynamic with HSTs!

They may be used as a unit within a block or be a block itself.
Usually, they are cut from two contrasting squares of fabric. This is so that each triangle actually shows up within the design.
They can be arranged in a number of ways to make other shapes - pinwheels, diamonds even flying geese - show up.
You can use them to help depict motifs such as fruit or alphabet letters.
Two contrasting squares fabrics when sewn together diagonally down the middle will yield two half square triangles.
Two At a Time HSTs
What to Cut
To get a half square triangle cut two squares the finished size of your block plus 7/8 inches. This will yield two at a time.
For example (refer to the photo below), if the finished size of your block is 4 inches cut two squares 4 7/8 inches (top left).
After sewing a 1/4 inch seam this will leave you with two 4 1/2 inch HSTs (top right), which includes the seam allowance.
The HST (bottom row) is now ready to be used in your quilt.
 making half square triangles using 7/8 inch rule
But, who wants to always measure and cut 7/8 inches?! You need a steady hand on that ruler :-)...
There is an easier way (thank heavens)!
Half Square Triangle Chart
An easier way is to cut the starting squares at least 1 1/4 inches larger than your finished size and then trim to the finished size (FS) you need...
For two FS 2 inch HSTs, cut two 3 1/4 inch squares, trim to 2 1/2.
For two FS 3 inch HSTs, cut two 4 1/4 inch squares, trim to 3 1/2.
For two FS 4 inch HSTs, cut two 5 1/4 inch squares, trim to 4 1/2.
For two FS 5 inch HSTs, cut two 6 1/4 inch squares, trim to 5 1/2.
For two FS 6 inch HSTs, cut two 7 1/4 inch squares, trim to 6 1/2.
For two FS 7 inch HSTs, cut two 8 1/4 inch squares, trim to 7 1/2.
For two FS 8 inch HSTs, cut two 9 1/4 inch squares, trim to 8 1/2.
I like to err on the side of caution, I cut my squares 1 1/2 inches larger than the finished size (FS) and then trim to size. Why?
For me it's easier to cut WOF (width of fabric) strips in 1/2 inch increments...
For two FS 2 inch HSTs, cut two 3 1/2 inch squares, trim to 2 1/2.
For two FS 3 inch HSTs, cut two 4 1/2 inch squares, trim to 3 1/2.
For two FS 4 inch HSTs, cut two 5 1/2 inch squares, trim to 4 1/2.
For two FS 5 inch HSTs, cut two 6 1/2 inch squares, trim to 5 1/2.
For two FS 6 inch HSTs, cut two 7 1/2 inch squares, trim to 6 1/2.
For two FS 7 inch HSTs, cut two 8 1/2 inch squares, trim to 7 1/2.
For two FS 8 inch HSTs, cut two 9 1/2 inch squares, trim to 8 1/2.
You get the idea. When I'm using scraps I may cut my squares 1 1/4 inch larger, but when I need to make a lot of HSTs I cut them 1 1/2 inch larger.
Remember, these measurements include a quarter inch seam allowance.
This method results in a little bit of waste, but a more accurate block size. Not to mention easier math!
How to Make Half Square Triangles
Note: Use a rotating rotary cutting mat to make trimming easier. With this type of mat you can turn the block for easy access to trim each side.
Step 1 Cut one square from two contrasting fabrics, fabrics A and B.
With the right sides together, place one square on top of the other.
On the top square, draw a diagonal line from one corner to the other using a ruler and a pencil or pen.

Pin the two squares together as shown. This helps to prevent the fabrics from shifting as you sew the squares together.

Step 2 With the quarter foot attached to your sewing machine, sew a 1/4 inch seam away from the drawn line.
Align the presser foot to one side of the line just a thread or two to the left of the diagonal line (so that the foot is beside the line) and sew along the length of the line, making a seam 1/4 inch away from the line.

Step 3 Without breaking thread, turn the block and sew a seam 1/4 inch away from the other side of the diagonal line.

When finished your block should look like the one in the picture below.
 HST with seams
Step 4 Place a ruler diagonally from one corner to its opposite corner on the drawn line and make a cut with the rotary cutter.
 align ruler along drawn line
 HST after cutting apart
Step 5 Open the half square triangles and with the right side of the fabric up press the seams towards the darker fabric.
 open and press
Step 6 Trim the HSTs. Using a square ruler the size that you want to trim the blocks to, align its 45 degree angle line along the diagonal seam line of the HST.

Using a rotary cutter, trim each side of the square.


Note: If you do not have a square ruler the size that you want to trim the block, line up the untrimmed HST with the grid lines on your cutting mat and use a straight edge ruler and rotary cutter to trim the block to size.
Step 7 Repeat steps 1 - 6 for any remaining HSTs.
Below is the back side of HSTs after trimming.

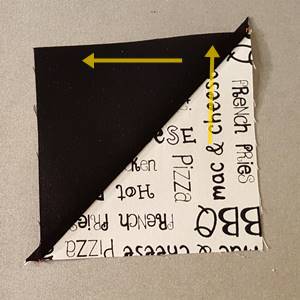
Pressing Half Square Triangles
There is a secret to pressing half square triangles. I discovered this tip in the Craftsy.com Block of the Month 2013 taught by quilter Laura Nownes.
Step 1 On your pressing board lay each HST, with the fabric that you want to press the seam towards on top, at a right angle as shown below.
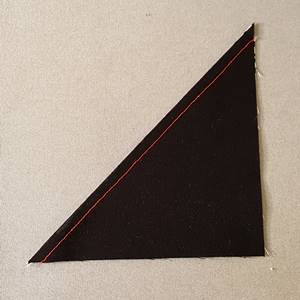
Step 2 On the wrong side of the HST press the seam to set it. Doing this relaxes the thread and the seam will lie flatter.
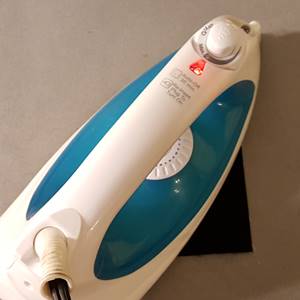
Step 3 Lift the top fabric of the HST, place the iron on the fabric and move the iron in a northerly direction, over the tip of the top of the seam.
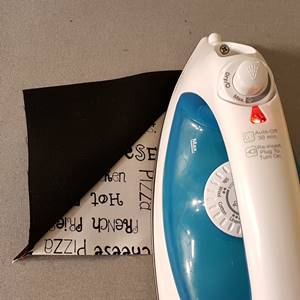
Step 4 Now move the iron in a westerly direction across the seam, pressing the HST open.
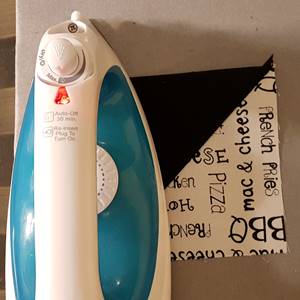
These arrows show the direction in which to move the iron across the seam. The trick is to start with placing the unsewn points of the HST at a right angle first.
HSTs and Directional Fabric
When you use directional fabric you need to be sure that before you cut the half square triangle you have the fabric correctly orientated.
You want your designs to be facing in the proper direction within the triangle unit.

To ensure this, correctly orient the print fabric square on your cutting mat.
Place the second square of fabric on top of the first squares.
For half of the HSTs that you want to make, draw the diagonal line in one direction.
For the other half of the HSTs you want to make, draw the line in the opposite direction.
When the HSTs are cut apart the design on the fabric will be facing its correct direction.

Matching Points of Half Square Triangles
See how to match the points on half square triangles and get a perfectly aligned center when sewing rows of HSTs that need to meet, like we do in a pinwheel quilt block.

What Blocks Use Half Square Triangles
Lots of quilt blocks use HSTs. Here are some with tutorials on scrapish.com...
Here's a fast and fun half square triangle quilt pattern.
Subscribe to the Quilt Blocks Digest newsletter for updates, special offers & exclusive content!
You will receive an email asking you to confirm your consent to subscribe. You must click on the confirmation link contained in that email in order to be subscribed and receive emails.
Your email address is never shared. Unsubscribe any time.
Recent Tutorials
-
Double Friendship Star Quilt Block Tutorial
Apr 05, 26 10:35 PM
 The double friendship star quilt block is easy to make. See step-by-step how and get fabric requirements for five sizes including 12 inch and bigger!
 -
Courthouse Steps Quilt Block Pattern Tutorial
Oct 23, 22 02:11 PM
See step-by-step how a courthouse steps quilt block pattern is stitched. It's a great companion block to use with star quilt blocks. -
Churn Dash Quilt Block Pattern Tutorial - 6 Inch, 9 Inch and 12 Inch
Jul 18, 22 07:11 PM
The churn dash quilt block looks difficult but is easy to piece. See step-by-step instructions with pictures. Get yardage for 3 sizes!


