Subscribe to the Quilt Blocks Digest newsletter for updates, special offers & exclusive content!
- Home
- How to Quilt
- QST Units No Marking
Quarter Square Triangle Tutorial
This post may contain affiliate links for which I receive compensation.
Learn to make quarter square triangle units faster...no making HSTs first! Make split quarter square triangles with ease!

There are many ways to make quarter square triangles (QSTs). Today, a lot of quilters make half square triangles first. However, this is not necessary.
You can cut two squares, right sides together, on each diagonal to make four QST units.
The placement of fabric and the side of the triangles that you stitch together
determines whether you get split quarter square triangles, non-mirror QSTs or hourglass units.
The instructions below demonstrate how to obtain each.
Quarter Square Triangle Math
The math for making quarter square triangles is finished size (FS) unit plus one and a quarter inches. For example, in a 12 inch block the finished size QST unit needed is 4 inches. To make the QSTs, from two different fabrics cut 1 (5 1/4 inch) square.
Finished Size QST Unit + 1 1/4 inches
If you like, make oversized units and then trim them to size. Add 1 1/2 inches to the finished size QST. This is how I make them.
Quarter Square Triangle Cutting Chart
Here are measurements for some common sizes of QST units used to make star quilt blocks.

In this tutorial the fabrics are designated as follows:
- Fabric A = blue print
- Fabric B = med blue variegated (background)
Quarter Square Triangle Instructions
WOF = Width Of Fabric
Seams are 1/4 inch unless otherwise noted.
Step 1 Spray and press all squares with a starch alternative pressing solution.
Place Fabric A square right side up and align Fabric B square right side down on top of it.

Step 2 Place a quilting ruler on the left leaning (\) diagonal axis of the squares. Use a rotary cutter and make a cut from corner to corner.
 diagonal axis and use a rotary cutter to make a cut along it.")
Step 3 Keep the two halves of the squares together. Place a quilting ruler on the right leaning (/) diagonal axis of the squares. Make a cut from corner to corner.
 diagonal axis and use a rotary cutter to make a cut along it.")
You've cut four quarter square triangle pairs.

Step 4 Place the QST pairs so that the outside edges are oriented in the 6 o'clock position.

Sewing Quarter Square Triangles
The QST units are ready to be sewn together.
Below are instructions on how to sew them together to get the units that you want: non-mirror QSTs, hourglass units or split quarter square triangles.
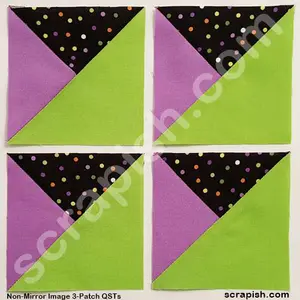
Non-Mirror Quarter Square Triangles
To get QSTs that are all the same (non-mirror or non-split), stitch each QST pair along the same edge.
 Photo 1
 Photo 2
Compare the above photos. Both were stitched with the background Fabric B on top. In Photo 1, the left edges are stitched together. In Photo 2, the right edges are stitched together. Notice the right-leaning versus left-leaning diagonal axis and the placement of the print fabric.
Before stitching, check that your fabric placement will be in the correct position once the units are stitched together.
The fabric that's on top when going under the needle will be on top when the unit is pressed open.
Hourglass Quarter Square Triangles
To make hourglass units, stitch two units together along the same side edges, the same fabric on top and rotate second unit (right-hand QST) into position.

Split Quarter Square Triangles
To get QSTs that are split (mirror image), stitch one QST pair along the left edge and one along the right.
Below, the units are sewn with background Fabric B on top.
, stitch two QST pairs along the left edge and two along the right. In the pic the units are sewn with background Fabric B on top.")
These split quarter square triangles are sewn with background Fabric B on the bottom.

The units are trimmed after the quilt block you're working on is made.
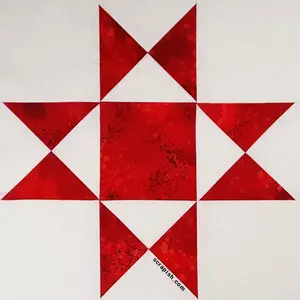
Blocks With Quarter Square Triangle Units
Making a quarter square triangle unit this way requires no marking. And, when it comes to the hourglass units you don't have to make half square triangles first.
This method comes in handy when making star quilt blocks such as the Double Friendship, Duck Tracks or Ohio Star. The quarter square triangle is a versatile quilt block unit!
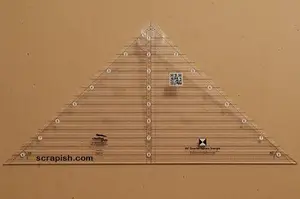
If you prefer another method see how to use 1/4 square triangle ruler or the 3 Patch Quarter Square Triangles Tutorial.
You might like these
3 Patch Quarter Square Triangle Tutorial - Use Formula or Chart
The 3 patch quarter square triangle is easy to make using half square triangles. Get the formula, size chart and see a video!
Ohio Star Quilt Block Made Easy and Fast, Even for Beginners
Ohio star quilt block directions using a quarter square triangle ruler. No lines to mark and very little trimming makes making a quilt faster.
How To Use A Quarter Square Triangle Ruler Tutorial
Find out how to use a quarter square triangle ruler and make quarter square triangles faster out of strips. See examples of quarter square triangles.
Subscribe to the Quilt Blocks Digest newsletter for updates, special offers & exclusive content!
You will receive an email asking you to confirm your consent to subscribe. You must click on the confirmation link contained in that email in order to be subscribed and receive emails.
Your email address is never shared. Unsubscribe any time.
Recent Tutorials
-
Double Friendship Star Quilt Block Tutorial
Apr 05, 26 10:35 PM
 The double friendship star quilt block is easy to make. See step-by-step how and get fabric requirements for five sizes including 12 inch and bigger!
 -
Courthouse Steps Quilt Block Pattern Tutorial
Oct 23, 22 02:11 PM
See step-by-step how a courthouse steps quilt block pattern is stitched. It's a great companion block to use with star quilt blocks. -
Churn Dash Quilt Block Pattern Tutorial - 6 Inch, 9 Inch and 12 Inch
Jul 18, 22 07:11 PM
The churn dash quilt block looks difficult but is easy to piece. See step-by-step instructions with pictures. Get yardage for 3 sizes!


