Subscribe to the Quilt Blocks Digest newsletter for updates, special offers & exclusive content!
- Home
- Quilt Patterns
- Cross Quilt
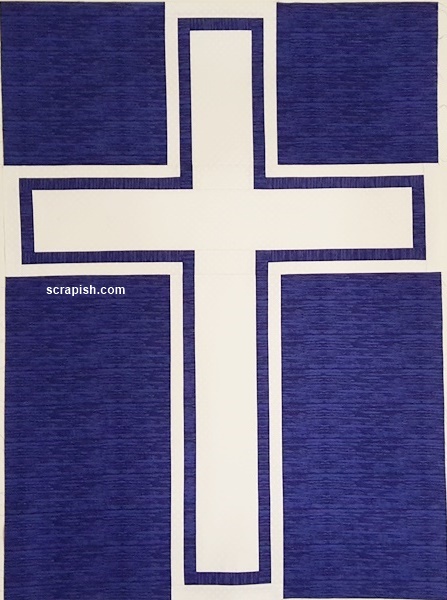
Holy Cross Quilt Pattern Tutorial
This holy cross quilt pattern does double duty. The entire quilt fits a hospital bed. But the medallion alone is baby quilt size.

Cross Quilt Design Inspiration
This cross quilt design was inspired by Randy C. (a visitor to Scrapish.com). He sent me an email stating, "I’m looking for a cross block. I would like to make a quilt with the cross in it, I’m fairly new at quilting so any help I would appreciate it."
After further inquiry I discovered that he wants to make "charity type quilt[s] for seniors in nursing homes as well as those less fortunate in hospitals." He's "also looking at making quilts for babies and children born prematurely."
What a noble endeavor!
Traditional Christian Holy Cross
The traditional Christian cross is made up of a horizontal crossbeam that intersects a vertical beam dividing it into a one-third top arm and a two-thirds descending arm.
Once intersected, the crossbeam piece reveals left and right side arms that are equal in length to the top arm.
Prerequisites
Let's get started on your cross quilt pattern. Yes, this is a long page, but the quilt is very easy to stitch up once all the pieces have been cut.
I suggest that you read through all instructions and study the Cross Quilt Pattern Medallion Assembly Diagram below before cutting any fabric.
If you’re unfamiliar with how to cut strips and make strip sets, please review these instructions:
https://www.scrapish.com/how-to-cut-strips.html
https://www.scrapish.com/strip-quilting.html
Cross Quilt Size
Quilt Size: 51 x 94 inches, approximately
Yardage Requirements
Fabric A: 5/8 yard (white)
Fabric B: 4 3/8 yards (blue)
Backing: 2 yards 108 inch wide backing fabric
Batting: prepackaged 90 by 108 inch queen size batting
Binding: 3/4 yards
Cross Quilt Pattern Medallion Assembly Diagram

Easy Holy Cross Quilt Pattern Instructions
WOF = Width Of Fabric
All seams are stitched with right sides of fabric together using a 1/4 inch seam.
Yardage has 42 inches of usable fabric.
Cut Fabric for Medallion
Step 1 Cut fabric for inner cross.
From Fabric A cut 1 (5 1/2 inch x WOF) fabric strip; subcut
1 (31 1/2 inch x 5 1/2 inch) strip (crossbeam)
2 (2 1/2 inch x 5 1/2 inch) strip (Bridge)
From Fabric A cut 1 (5 1/2 inch x WOF) fabric strip; subcut
1 (24 1/2 inch x 5 1/2 inch) (Descending Arm)
1 (11 1/2 inch x 5 1/2 inch) (Top Arm)
Step 2 Cut fabric for inner and outer outlines of the cross quilt pattern.
From Fabric A, cut 5 (1 1/2 inch x WOF) fabric strips.
From Fabric B, cut 5 (1 1/2 inch x WOF) fabric strips.

Step 3a From Fabrics A and B make 3 strip sets. Press seams toward Fabric B.

From each of two of the strip sets, subcut 1 (25 1/2 inch) length (for Descending Arm)
and 1 (12 1/2 inch) length (for Top Arm).
From the third strip set, subcut 3 (13 1/2 inch) lengths (for crossbeam).
Step 3b From 1 (1 1/2 inch x WOF) of Fabrics A and B strips (cut in Step 2), subcut
1 (13 1/2 inch x 1 1/2 inch) strip (leftover 28 1/2 inches).
Stitch together lengthwise to make 1 (13 1/2 inch x 2 1/2 inch) strip set (for crossbeam).
Step 3c From 3b leftover Fabric A 1 1/2 inch strip, subcut
3 (9 1/2 inch x 1 1/2 inch) strips (Endcaps C).
From 3b leftover Fabric B 1 1/2 inch strip, subcut
4 (5 1/2 inch x 1 1/2 inch) strips (Endcaps A).
Step 4 Cut up last Fabrics A and B 1 1/2 inch x WOF strips:
From Fabric A strip, subcut 1 (9 1/2 inch x 1 1/2 inch) strip (Endcap C).
From Fabric B strip, subcut 4 (2 1/2 inch x 1 1/2 inch) strips (Endcaps B).
Step 5 Cut fabric for Rows 2 and 4 right and left side panels:
From Fabric B cut 2 (13 1/2 inch x WOF) fabric strips; from each WOF strip subcut
1 (26 1/2 inch x 13 1/2 inch) strip (Row 4 Left and Right Panels) and
1 (13 1/2 inch x 13 1/2 inch) square (Row 2 Left and Right Panels).
Assemble Medallion
Assemble Top Arm
Step 6a Stitch one Endcap A to one end of Top Arm fabric piece. Press seams toward Fabric B. Now this is the top end of the cross quilt pattern.

Step 6b Stitch one Top Arm Strip Set to each long side of Top Arm/Endcap A (right sides together, Top Arm Strip Set on top and Fabric B edge aligned with Fabric A edge). (It helps to stitch with Top Arm Strip Set on top.) Press seams toward Fabric B.

Step 6c Stitch one Endcap C to the top end of the cross. Press seams toward Endcap C.
 units in a minute or so.")
Step 6d Stitch Row 2 Left and Right panels (13 1/2 inch square) to the left and right sides of Top Arm/Strip Set/Endcap unit.
The Top Arm section (Row 2) of the cross quilt pattern is now complete.
 to the left and right sides of Top Arm/Strip Set/Endcaps unit. The Top Arm section (Row 2) is now complete.")
Assemble Crossbeam Section
Step 7a Stitch one Endcap A to each end of Crossbeam. Press seams toward Endcaps A.
 postage stamp quilt blocks alternating white and red units.")
Step 7b Stitch one Endcap B to each short end of the two Bridge pieces. Press seams away from Endcaps B.

Step 7c Stitch one Crossbeam Strip Set, short end to short end, to each of the two Endcap B/Bridge/Endcap B units. Press seams away from Endcaps B.

Step 7d With Fabric B at bottom, stitch one Strip Set/Endcap B/Bridge/Endcap B/Strip Set unit to top of Crossbeam unit.
With Fabric B at top, stitch one Strip Set/Endcap B/Bridge/Endcap B/Strip Set unit to bottom of Crossbeam unit.
Press seams toward Strip Set units.

Step 7e Stitch one Endcap C to each short end of assembled crossbeam. Press seams toward Endcaps C.
The entire crossbeam section (Row 3) of the cross quilt pattern is now complete.
 is now complete.")
Assemble Descending Arm
The Descending Arm is assembled in the same way as the top Arm. For pictures, see Steps 6a to 6d.
Step 8a Stitch one Endcap A to one end of Descending Arm fabric piece (25 1/2 inch x 5 1/2 inch) as done in Step 6a. Press seam toward Endcap A. Now this is the bottom end of the cross.
Step 8b Stitch one Descending Arm Strip Set to each long side of Descending Arm/Endcap A unit
(right sides together, Descending Arm Strip Set on top and Fabric B edge
aligned with Fabric A edge) as done in Step 6b. (It helps to stitch with Descending Arm Strip Set on top.)
Press seams toward strip set units.
Step 8c Stitch one Endcap C to the bottom end of the cross as done in Step 6c. Press seam toward Endcap C.
Step 8d Stitch Row 4 Left and Right panels (26 1/2 inch x 13 1/2 inch) to the left and right sides of Descending Arm/Strip Set/Endcap unit.
The Descending Arm section (Row 4) of the cross quilt pattern is now complete.
Stitch Medallion Together
Refer to the Cross Quilt Pattern Medallion Assembly Diagram above.
Stitch together the three sections that make up the cross medallion.
Step 9a With right sides together, stitch the Crossbeam section (Row 3) to the Top Arm section (Row 2), matching the Endcap B seams with those of the inner outline (Fabric B) of the Top Arm. Press seam toward Top Arm section (Row 2).

Step 9b With right sides together, stitch the Descending Arm section (Row 4) to the
Crossbeam section (Row 3), matching the Endcap B seams with those of the
inner outline (Fabric B) of the Descending Arm. Press seam toward Descending Arm.
After Rows 2, 3 and 4 are stitched together the center of the medallion looks like the one shown in the photo below. The seams of the inner outline (Fabric B) of the cross match.

Step 10a Cut top (Row 1) and bottom (Row 5) background fabric pieces:
From Fabric B cut 2 (15 1/2 inch x WOF) fabric strips, subcut each into
1 (35 1/2 inch x 15 1/2 inch) strip for total of two.
Step 10b Stitch Row 1 Panel to Top of Cross section. Stitch Row 5 Panel to Descending Arm section. Press seams toward Panels.
The cross quilt pattern medallion is now complete.
Add Borders to Cross Quilt Pattern
For Steps 11a and 11b refer to the Cross Quilt Pattern Assembly Diagram below.
Note: For the long border strips, you may want to cut them a little longer (maybe by 1 or 2 inches) than the mentioned measurement and trim them to size once stitched on.
Step 11a Cut and add Side Borders 1 and 2: From Fabric B cut 5 (8 1/2 inch x WOF) fabric strips. Remove selvage ends. Stitch together each strip short end to short end.
Subcut 2 (94 1/2 inch x 8 1/2 inch) strips (leftover 21 inches).
Stitch one side border strip to each side of the cross quilt pattern medallion. Press seams toward borders.
Step 11b Cut and add Top and Bottom Borders: From Fabric B cut 2 (8 1/2 inch x WOF) fabric strips. Remove selvage ends. Stitch together each strip short end to short end.
Stitch left over fabric piece from cutting side borders to end of the fabric strips pieced together for top and bottom borders.
Subcut 2 (51 1/2 inch x 8 1/2 inch) strips.
Stitch one border strip to the top and one to the bottom of the quilt top.
Cross Quilt Pattern Assembly Diagram

Your cross quilt pattern quilt top is now complete!
Finishing Your Holy Cross Quilt
Batting: You'll need batting cut to at least 55 inches X 98 inches. You can purchase prepackaged queen size batting, which is about 90 by 108 inches. Or purchase it off the bolt cut more to the size needed.
Backing Fabric: 2 yards of 108 inch wide backing fabric. Cut it to approximately 55 inches X 98 inches.
Step 12 Put the cross quilt pattern quilt sandwich together. Layer it in this order: backing, batting and quilt top. Pin baste the three layers together.
Step 13 Now quilt the three layers together. Quilt as desired (of course) or may I suggest a straight line quilting pattern of diagonal lines, first going from left to right and then going from right to left of the quilt. Make the grid lines about 2 inches apart.
Step 14 Bind your quilt. From the 3/4 yard of fabric cut 8 (2 1/2 x WOF) strips, trim selvage ends and join to make a single long binding strip.
Cross Quilt Pattern Baby Quilt
Cross Quilt Medallion
The medallion, or center of the quilt, is large enough to make a baby quilt. If you only want to make it here's what you need:
Medallion Size: 35 x 48 inches
Fabric A: 5/8 yard (white)
Fabric B: 1 3/8 yards (blue)
Backing: 1 1/2 yards
Batting: prepackaged 45 by 60 inch crib size batting
Binding: 3/8 yard
Enjoy either quilt you make in this color scheme or your favorite colors. May you feel comforted!
You might like these
Cross Quilt Block Pattern Tutorial
This easy cross quilt block is presented in 6 inch and 12 inch sizes. Use it to make baby or queen size quilts.
Subscribe to the Quilt Blocks Digest newsletter for updates, special offers & exclusive content!
You will receive an email asking you to confirm your consent to subscribe. You must click on the confirmation link contained in that email in order to be subscribed and receive emails.
Your email address is never shared. Unsubscribe any time.
Recent Tutorials
-
Double Friendship Star Quilt Block Tutorial
Apr 05, 26 10:35 PM
 The double friendship star quilt block is easy to make. See step-by-step how and get fabric requirements for five sizes including 12 inch and bigger!
 -
Courthouse Steps Quilt Block Pattern Tutorial
Oct 23, 22 02:11 PM
See step-by-step how a courthouse steps quilt block pattern is stitched. It's a great companion block to use with star quilt blocks. -
Churn Dash Quilt Block Pattern Tutorial - 6 Inch, 9 Inch and 12 Inch
Jul 18, 22 07:11 PM
The churn dash quilt block looks difficult but is easy to piece. See step-by-step instructions with pictures. Get yardage for 3 sizes!


