Subscribe to the Quilt Blocks Digest newsletter for updates, special offers & exclusive content!
- Home
- Other Quilt Blocks
- Disappearing Nine Patch
Disappearing Nine Patch
Quilt Block Pattern Tutorial
Explore the versatile disappearing nine patch in several layouts. Get fabric requirements for various 9 patch block sizes.
This variation of the 9 patch block is also called a split nine patch.
It is so versatile and can be arranged in a lot of different ways. Start with a simple nine patch block with nine evenly cut squares and you end up with four squares.
Then, you can arrange the squares in a recognized pattern or place them more randomly for a very scrappy look.
Use this block to help bust your stash or use some of your scraps!
This block looks equally great when alternating two fabrics or using a different fabric for each square.
Take the following into consideration when placing your squares
in the original simple 9 patch block...
- The center square will be cut into four smaller squares.
- The squares in the middle column and row will be cut into two bars.
- The squares in the outside corners remain the same.
This will become crystal-clear in the steps below :-).
Okay, let's see how to make it.
Block Size Measurements
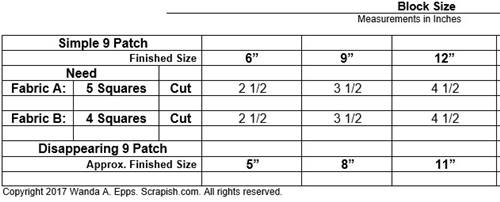
Here are the cutting measurements for a nine patch quilt block in three sizes: 6 inch, 9 inch and 12 inch, which results in a 5 inch, 8 inch and 11 inch disappearing nine patch, respectively.
(Note: To increase photo size, on your keyboard hold 'Ctrl' and hit the + key.)
A disappearing 9-patch block will be about one inch smaller than the simple nine patch.
Choose your block size, cut your fabric accordingly and follow the instructions below to make the block.
Disappearing Nine Patch Quilt Block Pattern Instructions
Step 1 Make a 9 Patch Block
We start by making a simple nine patch quilt block.
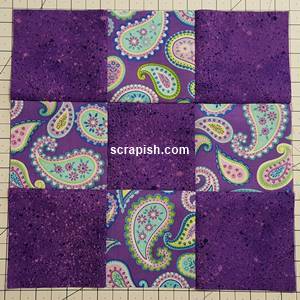
Step 2 Line Up Ruler
We will cut the entire block in half, twice, to make four squares. It will be very helpful to use a rotating cutting mat to make the cuts. Doing so lessons the chances that you will disturb the patches when making the second cut.
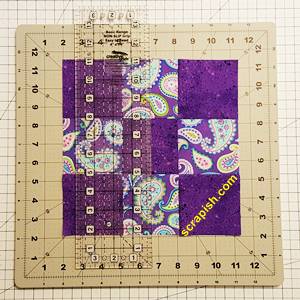
You can eyeball the cuts or if you are uncomfortable with that do this: divide your finished block size in half and find this measurement line on your ruler and place it on the seam line that connects columns 1 and 2.
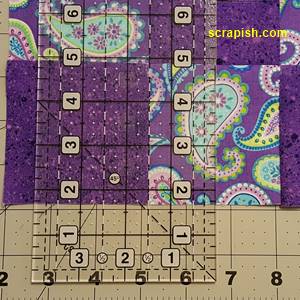
For example, the nine patch block above is made up of squares with a 3 inch finished size. I divide 3 by 2 and get 1 1/2 inches.
So I line up the 1 1/2 inch measurement line of the ruler on the seam lines to make my cuts.
Step 3 Cut Block
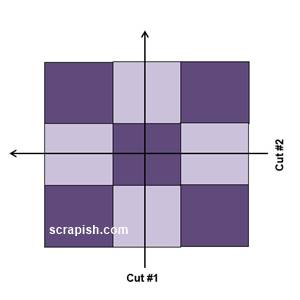
Refer to the diagram below. The first cut is made through column 2. The second cut is made through row 2.
On your block make cut one.
Rotate your cutting mat clockwise 90 degrees so that row 2 is now column 2, making sure that the squares are still aligned. Make the second cut.
If you're not using a rotating cutting mat you may need to walk around your cutting table or area to be in a better position to make the second cut.
Step 4 Separate Patches
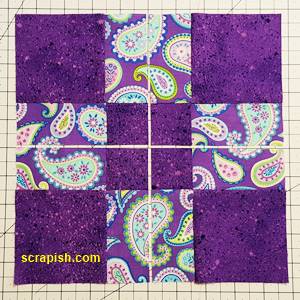
You now have four squares. Move the patches slightly apart.
What's so cool is that the simple nine patch looks like a different block even before moving the blocks into a different pattern. Very cool!
The center square is now cut into four smaller squares. The squares in the middle column and row are now bars. The squares on the outside corners remain the same.
Step 5 Rearrange Squares
Now let’s play... rearrange the four squares into a design that you like :-).
Here are a few ideas...
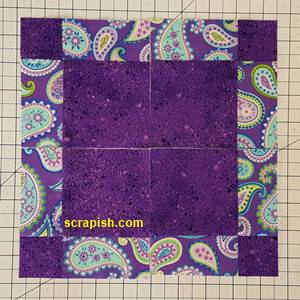
Disappearing Nine Patch Layout 1
Rotate each square 180 degrees to place the small squares in each outer corner of the block.
 Layout 1
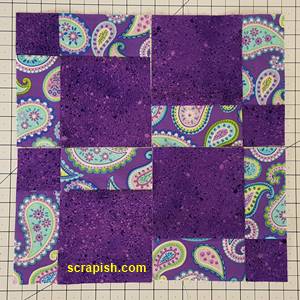
Disappearing Nine Patch Layout 2
Rotate the two squares in the left column so that the small squares are in the top left corner.
Rotate the two squares in the right column so that the small squares are in the bottom right corner.
This layout is a very scrappy pattern. If you use this block pattern be careful to match the seams on the outer square/bar combos.
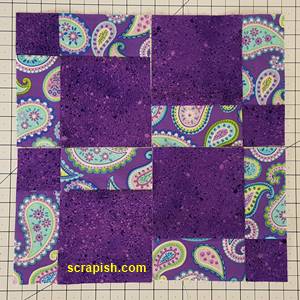 Layout 2
Disappearing Nine Patch Layout 3
This layout results in a diagonal chain-like design.
Let's look at this design row by row...
Row 1: In the first square the small square is in the top left corner. In the second square the small square is in the bottom left corner.
Row 2: In the first square the small square is in the top right corner. In the second square the small square is in the bottom right corner.
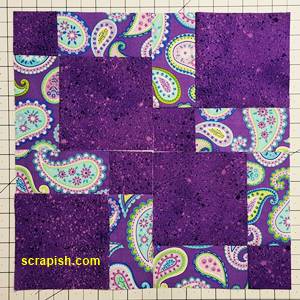 Layout 3
Sew Block Together
Step 6 Stitch Block
Choose your layout and sew the block together like you would any four patch quilt block pattern.
What If We Use 9 Different Fabrics
Step 1 Make a 9 Patch Block
In this nine patch block I used nine different 5 inch squares from a charm pack to make the block.
I simply arranged them in a pleasing order. I placed the square with the farm scene in an outer square so that it would not get cut up.
So do consider the placement of your squares. Remember, the squares in the center column and row will be cut.
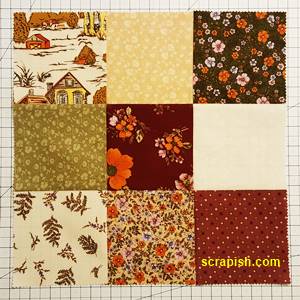
Step 2 Cut the Block
Line up the ruler on the block as done in Step 2 above.
Cut the block as done in Step 3 above.
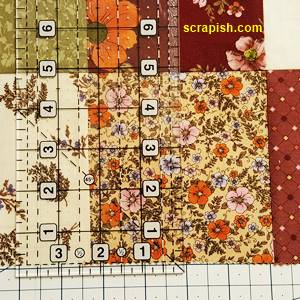
This nine patch block is made up of squares with a 4 1/2 inch finished size.
Half of 4 1/2 is 2 1/4 inches. So I lined up the 2 1/4 inch measurement line of the ruler on the seam lines to make my cuts.
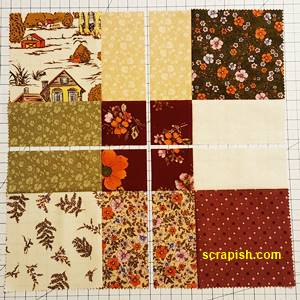
Step 3 Separate Squares
Move the patches slightly apart to reveal 4 squares.
Here is something to note... The farm scene square is directional fabric. This limited where I could place it within the block and how I could rotate it.
So, you may want to think about whether or not to use directional fabric when making a disappearing nine patch quilt block. In this case, I did not think before hand. Well, live and learn :-).
Step 4 Play
Rearrange the squares into a pleasing arrangement.
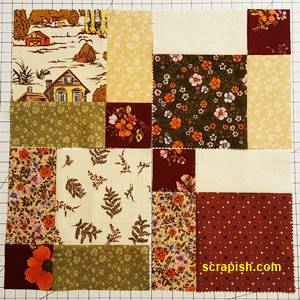
Disappearing Nine Patch Layout 4
Here's another diagonal chain-like design. But it looks a little different from the one in Layout 3 above.
Let's look at this design row by row...
Row 1:In the first square the small square is in the bottom right corner. In the second square the small square is in the top right corner.
Row 2: In the first square the small square is in the bottom left corner. In the second square the small square is in the top left corner.
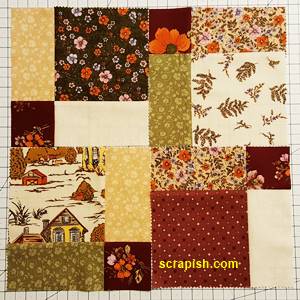
Disappearing Nine Patch Layout 5
Here the placement of the small squares looks like a windmill design.
Row by row...
Row 1: In the first square the small square is in the bottom left corner. In the second square the small square is in the top left corner.
Row 2: In the first square the small square is in the bottom right corner. In the second square the small square is in the top right corner.
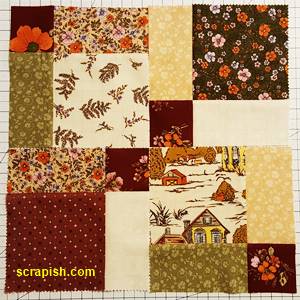
Disappearing Nine Patch Layout 3 Repeat
This is the same layout as number 3 above. However, the use of 9 different fabrics give the block an entirely different look. So do the choice of fabrics. The chain is less distinct with the use of lighter colored fabrics.
Row by row...
Row 1: In the 1st square the small square is in the top left corner. In the 2nd square the small square is in the bottom left corner.
Row 2: In the 1st square the small square is in the top right corner. In the 2nd square the small square is in the bottom right corner.
Stitch Block
Step 5 Stitch Block
Choose your layout and sew the block together like you would any four patch quilt block pattern.
Enjoy the versatility of the disappearing nine patch quilt block. Get creative, go wild, come up with a different layout!
Subscribe to the Quilt Blocks Digest newsletter for updates, special offers & exclusive content!
You will receive an email asking you to confirm your consent to subscribe. You must click on the confirmation link contained in that email in order to be subscribed and receive emails.
Your email address is never shared. Unsubscribe any time.
