Subscribe to the Quilt Blocks Digest newsletter for updates, special offers & exclusive content!
- Home
- Very Easy Star Blocks
- Hope of Hartford Star
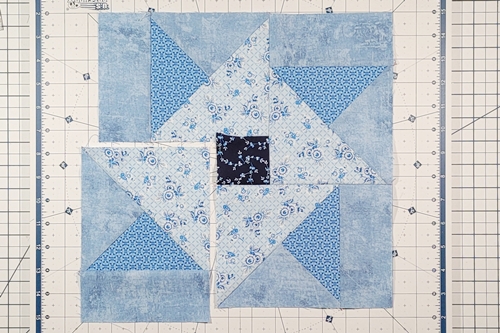
Hope of Hartford Quilt Block Pattern Tutorial
This post may contain affiliate links for which I receive compensation.
The Hope of Hartford quilt block is a square in a square star block where the quarter square triangle units are sewn in a log cabin like fashion.

The Hope of Hartford star appeared in the Farm Journal in 1945. The quarter square triangle units are attached, initially with a partial seam, clockwise to a center square as you would stitch a log cabin quilt block.
Let's get started...
The Hope of Hartford star quilt block is made up of
- two squares (Fabric A) cut on the diagonal to make the four half square triangles (HSTs) that form the primary star
- four background rectangles (Fabric B) in each corner
- four quarter square triangles (QSTs) made from the background (Fabric B) and another fabric (Fabric C) make the secondary star
- one small center square (Fabric D)
Hope of Hartford Quilt Block Cutting and Trimming Chart
In this tutorial the fabrics are designated as follows:
- Fabric A = light blue print
- Fabric B = background (med blue variegated)
- Fabric C = medium blue print
- Fabric D = dark blue print
The HSTs and QSTs squares are cut oversized and trimmed to size.
10 Inch Finished Size Block (10 1/2 unfinished size)
- Fabric A: Cut 2 (5 1/2 inch) squares (HSTs)
- Fabric B: Cut 4 (2 1/2 x 4 1/2 inch) rectangles (corners)
- Fabric B: Cut 1 (5 1/2 inch) square (QSTs)
- Fabric C: Cut 1 (5 1/2 inch) square (QSTs)
- Fabric D: Cut 1 (2 1/2 inch) square (center)
Note: Stitch the HST and QST units together to make the star points, then to 4 1/2 inches by centering on the 2 1/4 inch measurement line of the quilting ruler.
12 Inch Finished Size Block (12 1/2 unfinished size)
- Fabric A: Cut 2 (6 1/2 inch) squares (HSTs)
- Fabric B: Cut 4 (2 1/2 x 5 1/2 inch) rectangles (corners)
- Fabric B: Cut 1 (6 1/2 inch) square (QSTs)
- Fabric C: Cut 1 (6 1/2 inch) square (QSTs)
- Fabric D: Cut 1 (2 1/2 inch) square (center)
Note: Stitch the HST and QST units together to make the star points, then to 5 1/2 inches by centering on the 2 3/4 inch measurement line of the quilting ruler.
15 Inch Finished Size Block (15 1/2 unfinished size)
- Fabric A: Cut 2 (7 1/2 inch) squares (HSTs)
- Fabric B: Cut 4 (3 1/2 x 6 1/2 inch) rectangles (corners)
- Fabric B: Cut 1 (7 1/2 inch) square (QSTs)
- Fabric C: Cut 1 (7 1/2 inch) square (QSTs)
- Fabric D: Cut 1 (3 1/2 inch) square (center)
Note: Stitch the HST and QST units together to make the star points, then to 6 1/2 inches by centering on the 3 1/4 inch measurement line of the quilting ruler.
20 Inch Finished Size Block (20 1/2 unfinished size)
- Fabric A: Cut 2 (9 1/2 inch) squares (HSTs)
- Fabric B: Cut 4 (4 1/2 x 8 1/2 inch) rectangles (corners)
- Fabric B: Cut 1 (9 1/2 inch) square (QSTs)
- Fabric C: Cut 1 (9 1/2 inch) square (QSTs)
- Fabric D: Cut 1 (4 1/2 inch) square (center)
Note: Stitch the HST and QST units together to make the star points, then trim to 8 1/2 inches by centering on the 4 1/4 inch measurement line of the quilting ruler.
Hope of Hartford Quilt Block Instructions
WOF = Width Of Fabric
Seams are 1/4 inch unless otherwise noted.
Step 1 Spray and press the squares with a starch alternative pressing solution.
Place Fabric C QST square right side up and place Fabric B QST square right side down on top of it, aligning all of the edges.

Step 2 Use a rotary cutter to make a cut from corner to corner along both diagonal axes, resulting in four quarter square triangle pairs.

For step-by-step pictures of how you get from Step 1 to Step 2, see how to make quarter square triangle units.
Step 3 Rotate the QST pairs so that the outside side is oriented at the 6 o'clock position with fabric B still be on top. Stitch along the left-hand side of the QST pairs.

Fold Fabric B back to open the QST with right side of fabrics up, revealing two QSTs that form a half square triangle.
Orient the unit so that the background Fabric B forms the top edge of a square and Fabric C forms the left side of a square. The diagonal axis should lean to the right.
Press the seams toward the background Fabric B.
Step 4 Place both Fabric A HST squares, right sides up, on top of one another. Cut them in half along the left leaning (\) diagonal axis, yielding four HSTs. Press them in half along the diagonal edge.
 diagonal axis. Press in half along diagonal edge.")
Step 5 Using the fold as a guide, center a QST unit over each HST. Stitch a seam along the diagonal length.

Step 6 Peel the QST unit back and right side up to reveal the Hope of Hartford quilt block star points. Trim the units to size according to the cutting and trimming chart near the top of the page.

Step 7 Layout the block units as shown in the photo below. Pay particular attention to the orientation of the star point units (HST/QST units).
.")
Step 8 Refer to the photo in Step 7: Stitch A to B; C to D; E to F; G to H. Press the seams toward background Fabric B.

Stitch the Partial Seam
Step 9 Right sides together, place the center square (unit I) in the lower right corner of unit A/B. Stitch a 1/4 inch seam to the middle of the center square. Back stitch at the beginning and end.

Here's how unit A/B/I looks after the partial seam is sewn. You can see how unit C/D is the same length as units A/B/I.

Moving in a clockwise direction stitch the rectangular units to the center square of the Hope of Hartford quilt block.
Step 10 Stitch unit C/D to unit A/B/I. Press the seam toward the center square.
You can see how unit E/F is the same length as unit C/D/I.

Step 11 Stitch unit E/F to unit C/D/I. Press the seam toward the center square.
You can see how unit G/H is the same length as unit E/F/I.
Step 12 Stitch unit G/H to unit E/F/I. Press the seam toward the center square.

Now let's finish sewing the partial seam.
Step 13 Align the top edge of unit G/H with the bottom edge of unit A/B. Stitch a 1/4 inch seam. Overlap the seam a few stitches into the original partial seam and back stitch.

Step 14 Fold the bottom portion of the block right side up to reveal a complete Hope of Hartford quilt block! Press the seam toward the center square.

You're done making the Hope of Hartford quilt block!
Hope of Hartford Star Quilt Layout
Here's what an 88 x 90 inch queen size Hope of Hartford quilt block would look like in a column setting with 3-inch sashing strips, 8-inch alternating columns, and 5-inch top and bottom borders.

It uses the Hope of Hartford quilt block pattern in 12-inch finished size blocks (12 1/2 unfinished size) and alternate 8-inch plain columns.
Use it as a guide to make your own Hope of Hartford star quilt.
You might like these
Double Friendship Star Quilt Block Tutorial
The double friendship star quilt block is easy to make. See step-by-step how and get fabric requirements for five sizes including 12 inch and bigger!
Duck Tracks Quilt Block (yes, it's a star block) Tutorial
The duck tracks quilt block may be obscure. But it's an easy star block to make. See how step-by-step. Get fabric requirements for 8, 12, 16 and 20 inch sizes!
Friendship Star Quilt Block Tutorial - An Easy Star!
The friendship star quilt block is a beginner friendly easy block to make. Get 12 inch, 9 inch or 6 inch block measurements!

Subscribe to the Quilt Blocks Digest newsletter for updates, special offers & exclusive content!
You will receive an email asking you to confirm your consent to subscribe. You must click on the confirmation link contained in that email in order to be subscribed and receive emails.
Your email address is never shared. Unsubscribe any time.
Recent Tutorials
-
Double Friendship Star Quilt Block Tutorial
Apr 05, 26 10:35 PM
 The double friendship star quilt block is easy to make. See step-by-step how and get fabric requirements for five sizes including 12 inch and bigger!
 -
Courthouse Steps Quilt Block Pattern Tutorial
Oct 23, 22 02:11 PM
See step-by-step how a courthouse steps quilt block pattern is stitched. It's a great companion block to use with star quilt blocks. -
Churn Dash Quilt Block Pattern Tutorial - 6 Inch, 9 Inch and 12 Inch
Jul 18, 22 07:11 PM
The churn dash quilt block looks difficult but is easy to piece. See step-by-step instructions with pictures. Get yardage for 3 sizes!

