Subscribe to the Quilt Blocks Digest newsletter for updates, special offers & exclusive content!
- Home
- Quilt Patterns
- Hourglass
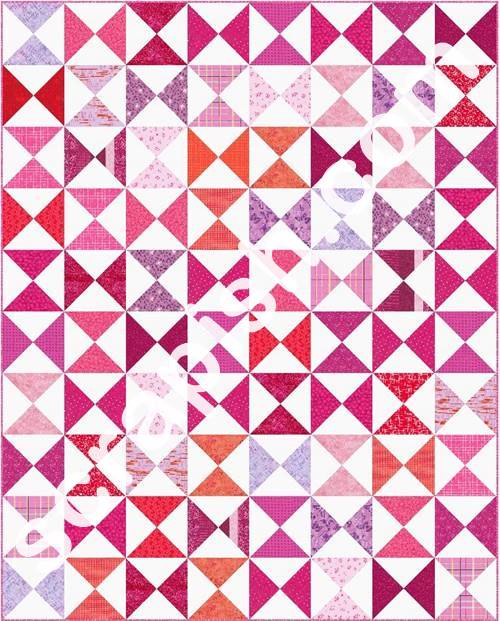
Hourglass Quilt Pattern
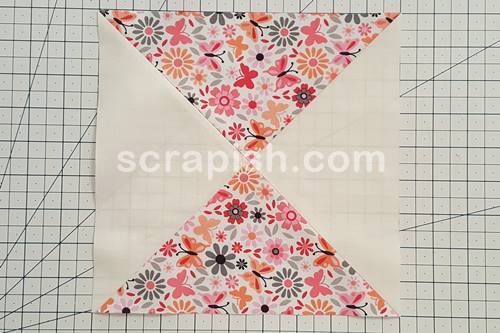
This super easy hourglass quilt pattern features an easy way to make an hourglass block. Make baby or twin/queen sizes easily!
The log cabin quilt block has been known to cultures since ancient times. Depictions of the basic construction of the block can be found in the artifacts of Egyptian, Roman, Peruvian and many other cultures.
Today the block remains a favorite among quilters perhaps because it can be constructed in an almost endless number of ways.
This traditional pattern is a straight setting layout which places the dark side and the light side of the block in the same positions throughout the pattern.
By doing this you end up with what looks like alternating dark and light straight lines.
Though I have kept the fabric in this virtual quilt pattern to three colors – black, white and red – you can use any color combination.
Dig into your fabric stash and pull out colors that appeal to you.
I encourage creativity! Allow your natural instincts, likes and dislikes, to guide your fabric choices.
Hourglass Pattern
Block Name: Hourglass Quilt Block
Finished Block Size: 8 1/2 inch (9 inch unfinished)
Setting: Straight Set, 8 x 10 blocks
Quilt Size: 68 x 85 inches (approximate)
Fabric Requirements: Quilt Top
To make a twin or queen size you'll need 2 (10 inch) precut squares packs (layer cakes). Be sure that each contains at least 40 squares. That's it!
Fabric A: 1 layer cake in prints (here, shades of pink, fuchsia, magenta, orange, red are shown)
Fabric B: 1 layer cake in a solid (here, off white is shown)
Hourglass Quilt Pattern Instructions
- All seams are 1/4 inch unless otherwise noted
- WOF = width of fabric
How to Make Hourglass Blocks
Note: Steps 1 and 2: See how to make and trim hourglass blocks in this Hourglass Block Tutorial. It's an easy way to make an hourglass quilt block!
Step 1 Make 80 Hourglass Blocks Make 80 (9 inch unfinished size) hourglass blocks. Use one square from each layer cake (you will use 40 squares from each layer cake).

Step 2 Trim Blocks Trim/square up all the blocks to size.
In this hourglass quilt pattern that's 9 inches square unfinished (yes, unfinished). When you start with 10 inch squares you can get 9 inch unfinished HSTs.
If you have to trim them smaller than 9 inches, that's okay. Just trim them all the same size.
Step 3 Layout Quilt Top
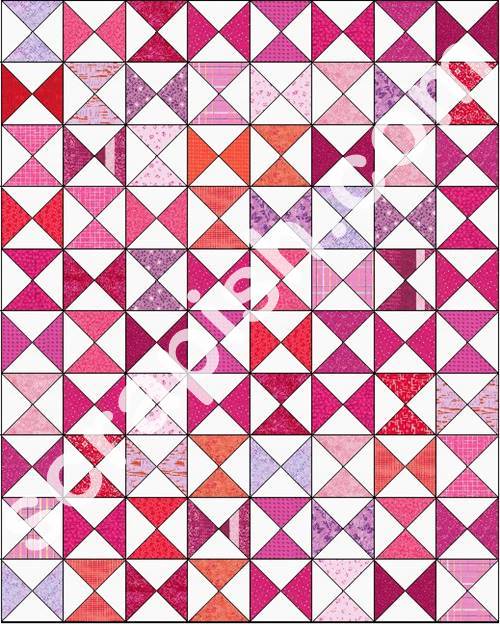
See the quilt assembly diagram shown below.
On your design wall, floor or wherever you have room, layout your quilt blocks - 8 per row of 10 rows, alternating the layout of the blocks.
In Row 1, the first block is oriented with the printed fabric going vertically. In the next block, the printed fabric is oriented going horizontally. Repeat this pattern for the entire first row.
For Row 2, orient the first block with the printed fabric going horizontally and the second block with the printed fabric going vertically. Continue to alternate the blocks for the entire row.
Continue to alternate the blocks in this manner for all successive rows.
Hourglass Quilt Assembly Diagram
 hourglass quilt pattern assembly diagram
Step 4 Sew Blocks Together
Sew the blocks of each row together.
For Row 1, press the seams to the right. For Row 2, press the seams to the left.
For each successive row continue to alternate pressing in this manner.
Step 5 Sew Rows Together
Sew the rows to one another. Start by stitching Row 2 to Row 1. Next, stitch Row 3 to Row 2, Row 4 to Row 3, and all other rows in the same manner.
Press these seams downward.
Finishing the Hourglass Quilt Pattern
Backing, Batting, Binding
Backing: 5 1/2 yards
Binding Fabric: 3/4 yard
Batting: prepackaged twin size (72 x 90 inches)
Step 6 Cut Backing Fabric
Cut the backing fabric in half crosswise (from selvage to selvage).
Cut off the selvages and stitch the two pieces together lengthwise (along the long edges) using a 1/2 inch seam allowance.
Press the seam to one side.
Step 7 Make the Quilt Sandwich
Put the hourglass quilt pattern quilt sandwich together by layering it in this order: backing, batting and quilt top.
Pin baste the three layers together.
Step 8 Quilt the Quilt
Now quilt the three layers.
May I suggest a straight line quilting pattern of diagonal lines, first going from left to right and then going from right to left of the quilt. Make the grid lines about 2 inches apart. This makes a crosshatch quilting pattern.
Or, if you know how to free-motion quilt go for it!
Step 9 Bind the Quilt
From 3/4 yards of fabric cut 8 (2 1/2 inch x WOF strips) strips and join to make a single long binding strip.
Attach the binding to the quilt sandwich.
Making this quilt pattern using layer cakes, or 10 inch squares, results in a quilt size that will fit a twin or queen size bed.
Hourglass Baby Quilt Pattern
You can make this hourglass quilt pattern using 5 inch charm squares to make an hourglass baby quilt.
Here are the fabric requirements and stats you will need...
Finished Block Size: 3 1/2 inch (4 inch unfinished)
Setting: Straight Set, 8 x 10 blocks
Quilt Size: 28 x 35 inches (approximate)
Fabric A: 1 print charm pack (5 inch squares)
Fabric B: 1 solid charm pack (5 inch squares)
Backing: 1 1/4 yards
Binding Fabric: 1/3 yard (need 4 strips)
Batting: prepackaged craft size (which is 45 x 60 inches) cut to 32 inches X 39 inches
To put it together follow the same twin/queen quilt pattern instructions.
Fabric Selection
Don't have any layer cakes handy? No problem. Make your own with fabrics from your stash or purchase more fabric (any excuse will do, right :-))!
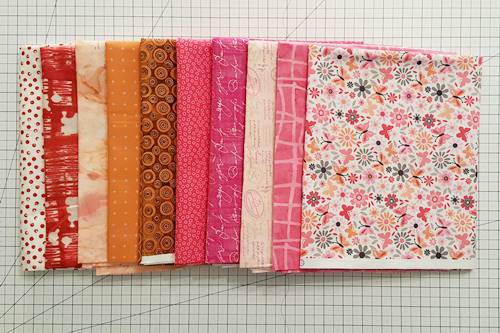
Simply choose a number of different fabrics. For example, choose ten different fabrics as shown in the picture below.

- First choose a primary print with lots of colors like the one on the right. It has shades of orange, fuchsia, pink, red, gray, black and white.
- Next, choose nine other fabrics with similar colors. Choose a variety of light, medium and dark prints. Determine which color you want to dominate in the quilt. Here, I chose pink.
- I chose five prints in shades of pink from light to dark. Then, I chose three orange prints and two red prints.
- Cut one (10 inch) strip from each print. Sub-cut four (10 inch) squares from each strip, for a total of 40 (10 inch) squares.
Note: To allow your primary print to be the focus of your quilt, cut two (10 inch) strips. This gives you eight (10 inch) squares in your primary fabric. Use more of it and less of some of the other prints to pair with your background fabric and make half square triangles.
Now, don't you agree that this hourglass quilt pattern was super easy!
Subscribe to the Quilt Blocks Digest newsletter for updates, special offers & exclusive content!
You will receive an email asking you to confirm your consent to subscribe. You must click on the confirmation link contained in that email in order to be subscribed and receive emails.
Your email address is never shared. Unsubscribe any time.


