Subscribe to the Quilt Blocks Digest newsletter for updates, special offers & exclusive content!
- Home
- Quilt Patterns
- Log Cabin
Log Cabin Quilt Pattern
Use this log cabin quilt pattern and 2 1/2 inch strips to make big blocks that finish at 14 inches. The traditional straight setting is beautiful!

The log cabin quilt block has been known to cultures since ancient times. Depictions of the basic construction of the block can be found in the artifacts of many cultures - Egyptian, Roman, Peruvian and more.
Today the block remains a favorite among quilters. Perhaps because it can be constructed in an almost endless number of ways.
This traditional pattern is a straight setting layout. It places the dark side and the light side of the block in the same positions throughout the pattern.
Doing this results in what looks like alternating dark and light straight lines.
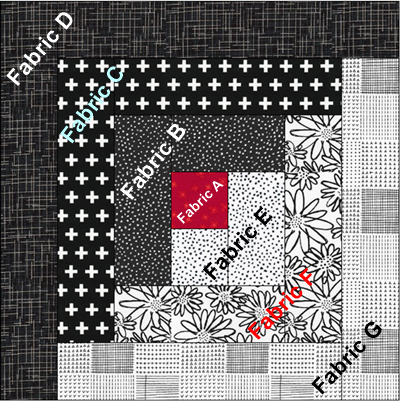
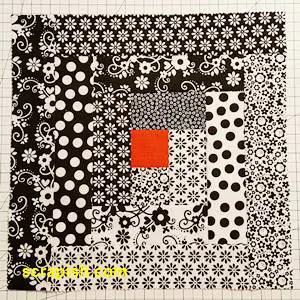
I chose my favorite color scheme for this virtual quilt pattern – black, white and red. Dig into your fabric stash and pull out three colors that appeal to you.
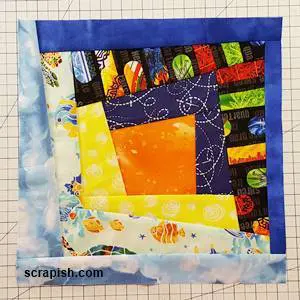
Or, if you're stuck, here are some tried and true color combos:
- red, white and blue
- red, black and grey
- purple, green and yellow
- black, grey and white
- orange, purple and green
Here's a good website for more ideas on color combos.
Log Cabin Pattern
Block Name: Log Cabin Quilt Block
Finished Block Size: 14 inches (14 1/2 unfinished)
Setting: Straight-Set, 7 x 7 blocks
Approximate Quilt Size: 98 x 98 inches (slightly larger than queen size)
General Fabric Requirements for Quilt Top
In addition to your usual quilting supplies here are general fabric requirements based on 40 - 42 inches of usable fabric.
- Fabric A: 1/2 yard (red centers)
- Fabric B: 1 yard (dark background 1)
- Fabric C: 2 yards (dark background 2)
- Fabric D: 3 yards (dark background 3)
- Fabric E: 1 yard (light background 1)
- Fabric F: 1 3/4 yards (light background 2)
- Fabric G: 2 1/4 yards (light background 3)
The above yardage amounts to 6 yards of dark and 5 yards of light background fabric. Each yard of fabric should yield 14 (2 1/2 inch) strips.
If you're using 2 1/2 inch jelly roll packs you will need at least 4 jelly rolls for the 'logs'. Each jelly roll is about 3 yards of fabric. This would be about 12 yards of fabric.
Log Cabin Quilt Pattern Instructions
- All seams are 1/4 inch unless otherwise noted
- WOF = width of fabric
Step 1 Make Log Cabin Blocks
Start by cutting the fabric into 2 1/2 inch strips to make the log cabin blocks.
Or...
Use jelly roll 2 1/2 inch precut strips to make your blocks.
Make 49 (14 1/2 inch) unfinished size log cabin blocks.
Step 2 Trim Blocks
Trim/Square Up the blocks to size. In this log cabin quilt pattern that's 14 1/2 inches square unfinished. If your blocks are not 14 1/2 inches square, simply trim them all to the same size.
If you have to trim them smaller than 14 1/2 inches, that's okay. Just trim them all to the same size.
Step 3 Layout Quilt Top
On your design wall, floor or wherever you have room layout your quilt blocks as shown in the quilt assembly diagram shown below.
Log Cabin Quilt Assembly Diagram
 queen size log cabin quilt pattern assembly diagram
Step 4 Sew Blocks To One Another
Sew the blocks of each row together. Starting with Row 1, press the seams to the right. For each successive row alternate pressing in opposite directions.
Step 5 Sew Rows Together
Sew the rows to one another. Starting by stitching Row 2 to Row 1.
Stitch Row 3 to Row 2, Row 4 to Row 3, and all other rows in the same manner.
Press these seams downward.
Finishing the Log Cabin Quilt Pattern
Backing, Batting, Binding
Backing: 3 yards of wide backing fabric (usually 108 x 108 inches).
Binding Fabric: 1 yard
Batting: prepackaged king size (which is 120 x 120 inches). Trim to approximately 102 inches X 102 inches.
Step 6 Trim Backing Fabric
Trim to approximately 102 inches X 102 inches.
Step 7 Make the Quilt Sandwich
Put the log cabin quilt pattern quilt sandwich together. Layer in this order: backing, batting and quilt top.
Pin baste the three layers together.
Step 8 Quilt the Quilt
Now quilt the three layers.
May I suggest a straight line quilting pattern of diagonal lines, first going from left to right and then going from right to left of the quilt. Make the grid lines about 2 inches apart. This makes a crosshatch quilting pattern.
Or, if you know how to free-motion quilt go for it!
Step 9 Bind the Quilt
From yard of binding fabric cut 10 (2 1/2 inch x WOF strips) strips and join to make a single long binding strip.
Attach the binding to the quilt sandwich.
The log cabin quilt pattern is easy for beginners to make because it doesn't have matching seams. However, beginners, you may want to send your queen size log cabin quilt out to a long arm quilter to have it quilted.
Enjoy piecing and/or quilting this free log cabin quilt pattern using jelly rolls or yardage.
Happy quilting!
You might like these
Courthouse Steps Quilt Block Pattern Tutorial
See step-by-step how a courthouse steps quilt block pattern is stitched. It's a great companion block to use with star quilt blocks.
Log Cabin Quilt Block Pattern Tutorial - Big Block!
Easy log cabin quilt block using 2 1/2 inch strips... Beginner and experienced quilters get out your jelly rolls! Use your charm packs too.
Wonky Log Cabin Block Pattern Tutorial for Beginners
The wonky log cabin block is so much fun! And oh so easy for a beginner. Some call it a crazy log cabin quilt block...

Subscribe to the Quilt Blocks Digest newsletter for updates, special offers & exclusive content!
You will receive an email asking you to confirm your consent to subscribe. You must click on the confirmation link contained in that email in order to be subscribed and receive emails.
Your email address is never shared. Unsubscribe any time.
Recent Tutorials
-
Double Friendship Star Quilt Block Tutorial
Apr 05, 26 10:35 PM
 The double friendship star quilt block is easy to make. See step-by-step how and get fabric requirements for five sizes including 12 inch and bigger!
 -
Courthouse Steps Quilt Block Pattern Tutorial
Oct 23, 22 02:11 PM
See step-by-step how a courthouse steps quilt block pattern is stitched. It's a great companion block to use with star quilt blocks. -
Churn Dash Quilt Block Pattern Tutorial - 6 Inch, 9 Inch and 12 Inch
Jul 18, 22 07:11 PM
The churn dash quilt block looks difficult but is easy to piece. See step-by-step instructions with pictures. Get yardage for 3 sizes!

