Subscribe to the Quilt Blocks Digest newsletter for updates, special offers & exclusive content!
- Home
- Other Quilt Blocks
- Wonky Log Cabin
Wonky Log Cabin Block Pattern Tutorial
Stitch a wonky log cabin block in no time. It's easy for beginners and some call it a crazy log cabin quilt block.

Talk about an easy block! Beginners, you will absolutely love - love, love - the wonky log cabin. It's a little crazy!
And, it gets better... Every step is improvisational!
Start with a center square, just like in a traditional log cabin. But, use any color to represent the 'hearth'. How cool, right?! Use your creativity.
Next, add logs (strips of fabric) around each side of the square at an angle. The angles give the block its wonky nature. They make it look like a modern log cabin quilt block.
You can add the logs at any position around the square.
I started by adding the first log on the right side (3 o'clock position) of the center square. Then, added the remaining logs in a counterclockwise direction.
You can add the logs in a clockwise direction. The point is to follow the same direction when adding the logs. So, add all of the logs in a clockwise direction. Or, a counterclockwise direction.
To make the wonky log cabin block use scraps or strips cut from yardage. Just be sure that the fabric piece is
- long enough to cover the piece its being added to and
- one side of the strip has a straight edge.
Let's get started!
Quilt Block Fabrics
- 1 (4 to 5 inch) square of fabric for the center square
- Lots of scraps or cut strips of fabric in various colors in varying widths from about 2 inches to 3 or 4 inches by at least 6 to 12 inches long.
Quilt Block Assembly Diagram
Look at this quilt block assembly diagram. It shows you the order in which to stitch the logs to and around the center square. (In the diagram below, the center may not look like a square, but it did start out as a square.)
 Wonky Log Cabin Block Assembly Diagram
The center square is labeled 'center'. The logs are numbered 1 - 12. Think of the sides of the center square as the 3 o'clock (right side), 6 o'clock (bottom), 9 o'clock (left side) and 12 o'clock (top) positions on a clock.
For this log cabin block, stitch the first log (1) to the center at the 3 o'clock position. Then proceed counterclockwise around the center.
Refer to this diagram as needed while you assemble your block.
Quilt Block Measurements
I'm aiming for a 12 inch wonky log cabin in this tutorial.
To get the block the size you want, you continue to add logs around the center in what's called rounds. After adding each round, use a squaring up ruler to check the size of the block.
Add rounds until the block is 1 or 2 inches greater than the size that you want. Then, trim the block using a squaring up rotary cutter ruler (you'll see this being used when we get to this step).
Wonky Log Cabin Block Instructions
Step 1 Choose scraps or cut strips of fabric in varying widths from about 2 inches to 3 or 4 inches by at least 6 to 12 inches long. Just be sure that the scrap is long enough to cover the section of the block that you're working on.
For the center 'square', cut a piece of fabric that has four sides and is about 4 to 5 inches wide. It does not have to be exactly square. Nor do the sides have to be straight. We can cut them straight as we go.

Step 2 Place the center fabric on your cutting mat right side up.

Step 3a Choose a dark fabric strip. You can start with dark or light fabrics. For this wonky log cabin block, I start with the dark fabrics first.
For the first log, place a fabric strip, right side down, vertically with its straight edge along the right side (3 o'clock position) of the center fabric.
Angle the strip about 1/4 to 1/2 inch away from the edge of the center fabric and towards the inside of the center fabric.

Step 3b Place a straight edge ruler along the straight edge of the fabric strip. Make a cut along the edge of the ruler, trimming the square in line with the fabric strip.

Step 3c Sew the square to the strip using a 1/4 inch seam along the right side of the two.

Step 3d Back on the cutting mat, trim the fabric strip edges in line with the perpendicular edges of the center fabric.
Just align a straight edge ruler along the same angle of the perpendicular edge of the center fabric and trim as shown in the photo below. In doing this, if you trim fabric from the center square that's okay. It gives the center a straight edge.
Trim the excess fabric from both sides of the strip.

Step 3e Open the two pieces of fabric with the right sides up. Ensure that log 1 (strip just added) is in the 3 o'clock position (1 on the block assembly diagram).
Finger press the seam away from the center.

Step 4a Choose a dark fabric strip (can be the same print fabric strip or a different light strip). Place it, horizontal and right side up, onto your cutting mat along the top edge of the center and log 1. Ensure that it is long enough to cover both. Here, I subcut a piece from a long strip.

Step 4b At
your sewing machine, lead with the log just sewn. Meaning, start
stitching with the last log sewn going under the needle first.
Place the fabric strip right side up underneath sewing machine needle. Place center square/log 1, right side down, on top of the strip, near the top end of it.
Sew the unit to the strip using a 1/4 inch seam along the right side of the two.

Step 4c Lay the entire unit on your cutting mat with the center and log 1 right sides up and the strip (log 2) just sewn in the 12 o'clock position.

Step 4d Fold log 2 open with the right sides up. Ensure that log 2 (2 on the wonky log cabin block assembly diagram) is in the 12 o'clock position.
Finger press the seam away from the center.
Use a ruler to trim the excess fabric from the right side of the strip. Angle the ruler along the right edge of log 1, trimming a part of log 1 if necessary to straighten it's edge.

Step 4e Use a ruler to trim the excess fabric from the left side of the strip. Angle the ruler about 1/4 to 1/2 inch into the center square, trimming off part of it. This leaves this side of the square cut at an angle to make it 'wonky'.

Step 5a Repeat Steps 4a - 4e to stitch the first light log to the 9 o'clock position (3 on the block assembly diagram) of the center square/logs 1 and 2 unit.
Choose a light fabric strip. Place it, vertically right side up onto your cutting mat.
Place center square/light log unit, right side down, on top of the strip, near the top end of it.
At your sewing machine, lead with the log just sewn.
Sew the unit to the strip using a 1/4 inch seam along the right side of the strips.

Trim the excess fabric. Open the units with the right sides up. Ensure that log 3 (3 on the wonky log cabin block assembly diagram) is in the 9 o'clock position.
Finger press the seam away from the center.
Step 5b Repeat Steps 4a - 4e to stitch the second light log to the 6 o'clock position (4 on the block assembly diagram) of the center square/light log unit.
Note: Before trimming logs 3 and 4, check the size of your wonky log cabin block.
Use a squaring up ruler to check the size of your block. Do this after adding each round of logs.
At this point my block is over 6 inches all the way around. I am going for a 12 inch block.

Step 5b continued... First, I'm going to trim the fabric of logs 3 and 4. I used really wide strips, so I'll trim them on an angle to make skinnier logs. Then, add another round of strips.
Ensure that the log 4 (4 on the wonky log cabin block assembly diagram) is in the 6 o'clock position.
Finger press the seam away from the center.
This completes Round 1 of your wonky log cabin block. Woohoo!

Step 6a Repeat Steps 4a - 5b to stitch a second round (logs 5, 6, 7, and 8) of logs.
To start Round 2, choose a dark fabric strip, different from those already used. Starting at the 3 o'clock position (log 5 on the block assembly diagram) stitch log 5 to the Round 1 logs. Finger press the seam toward the outer log. Trim.

Step 6b Repeat Steps 4a - 5b to complete Round 2. Refer to the Wonky Log Cabin Block Assembly Diagram as necessary.

Step 6e With Round 2 complete, check the size of your block as done in Step 5b. If you need a larger size, add another round of logs.
Step 7a Repeat Steps 4a - 5b to add a third round of logs (numbers 9, 10, 11 and 12 to the wonky log cabin quilt block assembly diagram).
If this is to be your last round of logs, use fairly wide strips or scraps to allow enough fabric to trim the block at an angle.

Step 7b Use a squaring up ruler to check the size of your block. At this point my block is well over the 12 inch size that I'm aiming for.
So, I use a 12 1/2 inch squaring up ruler to square up the block on an angle.
Place the ruler so that you have at least a 1/2 inch of fabric extending from all seams.
Once you're sure of the placement, trim the block.

Step 8 Press the entire wonky log cabin block with an iron.
You're done!!!
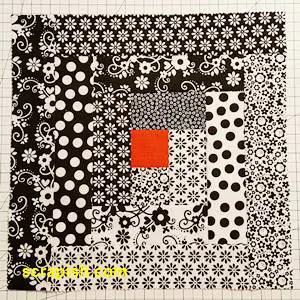
Your block should be a wonky, crazy, scrappy thing of beauty!!!
Here's a picture of the backside of the wonky log cabin quilt block. It show the seams pressed away from the center square.

Crazy Wonky Log Cabin Quilt Block
Your fabric choices are up to you. You can use the same fabric for the dark logs or light logs of any round.
Or, you can go really crazy and use a different fabric for each log in each different round as I did for the block shown below.
How wonderfully crazy!

Make your wonky log cabin block as large as you need to by simply adding rounds of logs until you get a block size that works for your quilt pattern.
Wonky Log Cabin Quilt Pattern Sizes
To make a queen or king size quilt you may want to make 16 inch or 18 inch blocks. For a twin or baby wonky log cabin quilt a 9 inch or less block size might be appropriate. Here are the number of 12 inch blocks required for various quilt sizes:
- Baby: 12 Blocks, 3 x 4 Rows, 36 x 48 inches
- Twin: 30 blocks, 4 x 6 rows, 48 x 72 inches
- Queen: 56 blocks, 7 x 8 rows, 84 x 96 inches
- King: 64 blocks, 8 x 8 rows, 96 x 96 inches
If you are a beginner and need help making the quilt top, here's how a basic quilt top is put together.
Experiment... Really make this block, and quilt, your own!
You might like these
Courthouse Steps Quilt Block Pattern Tutorial
See step-by-step how a courthouse steps quilt block pattern is stitched. It's a great companion block to use with star quilt blocks.
Log Cabin Quilt Pattern - Free and Easy!
This log cabin quilt pattern has a traditional straight setting. Use 2 1/2 inch strips for quick, big blocks at 14 1/2 inches, unfinished!
Log Cabin Quilt Block Pattern Tutorial - Big Block!
Easy log cabin quilt block using 2 1/2 inch strips... Beginner and experienced quilters get out your jelly rolls! Use your charm packs too.

Subscribe to the Quilt Blocks Digest newsletter for updates, special offers & exclusive content!
You will receive an email asking you to confirm your consent to subscribe. You must click on the confirmation link contained in that email in order to be subscribed and receive emails.
Your email address is never shared. Unsubscribe any time.
Recent Tutorials
-
Double Friendship Star Quilt Block Tutorial
Apr 05, 26 10:35 PM
 The double friendship star quilt block is easy to make. See step-by-step how and get fabric requirements for five sizes including 12 inch and bigger!
 -
Courthouse Steps Quilt Block Pattern Tutorial
Oct 23, 22 02:11 PM
See step-by-step how a courthouse steps quilt block pattern is stitched. It's a great companion block to use with star quilt blocks. -
Churn Dash Quilt Block Pattern Tutorial - 6 Inch, 9 Inch and 12 Inch
Jul 18, 22 07:11 PM
The churn dash quilt block looks difficult but is easy to piece. See step-by-step instructions with pictures. Get yardage for 3 sizes!

