Subscribe to the Quilt Blocks Digest newsletter for updates, special offers & exclusive content!
- Home
- Quilt Patterns
- Monkey Wrench
Monkey Wrench Quilt Pattern
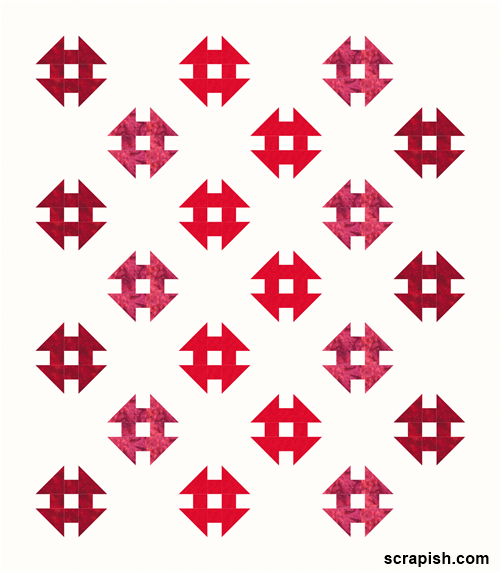
An easy monkey wrench quilt pattern uses big blocks - 12 1/2 inches - and subtle color change in for a striking design. Beginners will love it!
The subtle color change to create a harmonious design that highlights the monkey wrench blocks.
It is a great graphic design which is popular in modern quilts. Depending upon your color choices I think this pattern is suitable for kids and adults alike.
Change up the colors to suit your home's color scheme. Raid your stash for scraps for a scrappier design.
The monkey wrench block alternates with plain blocks to give the blocks room to breath and show off.
This allows you to avoid matching seams, which would be the case if all the blocks were a monkey wrench.
Block Name: Monkey Wrench Quilt Block
Finished Block Size: 12.5 inch
Setting: Straight-Set, 6 x 7 blocks
Approximate Finished Quilt Size: 87 x 99.5 inches
Fabrics for Quilt Top
In addition to your usual quilting supplies here are your fabric requirements, based on 40 - 42 inches usable fabric.
Rounded to the nearest 1/4 yard.
To make this really simple just use a dark, medium and light red fabric.
But consider using subtly mottled, tone-on-tone, or print fabrics in three shades of red, gradating from dark to light. Hand-dyed fabrics will add a subtle sophistication similar to that of the pattern.
3/4 yard Fabric A - dark shade of maroon red
3/4 yard Fabric B - medium shade of hand dyed pinkish red
3/4 yard Fabric C - lighter shade of mottled red
6 1/2 yards Fabric D - off white*
*Assumes that you will piece border strips.
Backing, Binding, Batting Fabrics
Backing: 3 yards of 108 inch wide backing fabric
Binding Fabric: 3/4 yards
Batting: queen size (or 91 inches X 104 inches)
Prerequisites
Monkey Wrench Quilt Pattern
- All seams are 1/4 inch unless otherwise noted.
- WOF = width of fabric
Cut Fabric for Units
(Note: Oversized squares are used to make the HSTs, which are trimmed to size.)
Block A: From Fabric A - dark shade of maroon red cut:
3 (6 1/2 inch x WOF) strips; subcut 14 (6 1/2 inch) squares for HSTs
2 (2 1/2 inch x WOF) strips for bars
Block B: From Fabric B - medium shade of hand dyed pinkish red cut:
3 (6 1/2 inch x WOF) strips; subcut 14 (6 1/2 inch) squares for HSTs
2 (2 1/2 inch x WOF) strips for bars
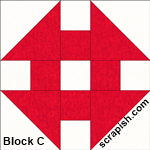
Block C: From Fabric C - lighter shade of mottled red cut:
3 (6 1/2 inch x WOF) strips; subcut 14 (6 1/2 inch) squares for HSTs
2 (2 1/2 inch x WOF) strips for bars
Blocks A, B, C: From Fabric D - off white cut:
7 (6 1/2 inch x WOF) strips; subcut 42 (6 1/2 inch) squares for HSTs
6 (2 1/2 inch x WOF) strips for bars
2 (2 1/2 inch x WOF) strips; subcut 21 (2 1/2 inch) squares for center squares
Alternate Squares: From Fabric D - off white cut:
7 (12 1/2 inch x WOF) strips; subcut 21 (12 1/2 inch) squares (Note: You can wait to cut these after you make and trim to size the monkey wrench quilt blocks.)
When Cutting/Piecing Long Strips
For the border strips, the exact measurements for the pattern are given. But to account for variations that can occur in cutting and stitching you may want to piece each strip about 2 inches longer than specified and trim to size after attaching to the main quilt body.
Cut Fabric for Borders
Outer Border
From Fabric D (off white) cut:
10 (6 1/2 inch x WOF) strips
Make the Monkey Wrench Blocks
 Make 7 Make 7 |
 Make 7 Make 7 |
 Make 7 Make 7 |
For this monkey wrench quilt pattern you'll need to make 21 (12.5 inch) blocks. For each block you will need
- 4 HSTs
- 4 square bar units
- 1 center square
Instructions are written below without pictures. Refer to monkey wrench quilt block pattern to see step by step pictures of how to make the block together.
Step 1 Make HSTs
Block A:
Using the 6 1/2 inch squares in Fabrics A (dark shade of maroon red) and D (off white) make 28 half square triangles (HSTs).
Use a pencil to draw a diagonal line from corner to corner on the wrong side of the 14 (6 1/2 inch) Fabric D squares.
With right sides together and fabric D on top, pair one Fabric D square and one Fabric A (or B or C) square.
Stitch a 1/4 inch seam away from both sides of the marked line.
Use a rotary cutter to cut the square apart on the marked diagonal line.
Press seam toward fabric A (or B or C).
Trim HSTs to 5 1/2 inches.
Block B: Repeat for Block B using Fabrics B and D.
Block C: Repeat for Block C using Fabrics C and D.
Step 2 Make Bars
Block A:
Using the 4 (2 1/2 inch x WOF) strips for bars from Fabrics A and D make two strip sets with one of each fabric in each strip set. With the right sides together, sew a 1/4 inch seam down the longest side of each strip set.
Leave the strip sets folded and from each, cut 14 (2 1/2 inch) bar units. (You will have a little excess fabric left over.)
Open the bar units. Press the seam toward the darker fabric.
Block B: Repeat for Block B using Fabrics B and D.
Block C: Repeat for Block C using Fabrics C and D.
Step 3 Layout Blocks Block A (or B or C): Near your sewing machine layout the units for each of the 7 blocks in a 9 patch grid as shown. Just stack one on top of the other.

Step 4a Sew Units of Each Row
Sew the units of Row 1 together. Press seam inward towards column 2.
Sew the units of Row 2 together. Press seam outward towards columns 1 and 3.
Sew the units of Row 3 together. Press seam inward towards column 2.
Step 4b Sew Rows Together
Sew Row 2 to Row 1. Press seam upwards toward Row 1.
Sew Row 3 to Row 2. Press seam downwards toward Row 2.
Step 5 Trim Blocks Trim the blocks to size. In this money wrench quilt pattern that's 12 1/2 inches square. If your blocks are short of being 12 1/2 inches square, simply trim them all a little smaller and to the same size.
Step 6 Make B Blocks Repeat Steps 3 to 5 for Block B.
Step 7 Make C Blocks Repeat Steps 3 to 5 for Block C.
Money Wrench Quilt Pattern
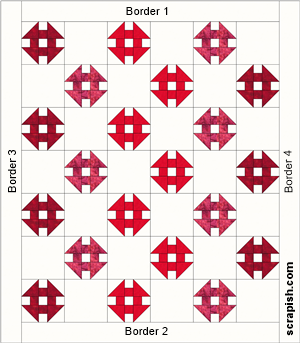
Quilt Assembly Diagram
 quilt assembly diagram
Refer to the monkey wrench quilt pattern quilt assembly diagram.
Step 8 Layout the 12.5 inch monkey wrench blocks and plain 12.5 inch squares as shown in quilt assembly diagram. (If necessary, trim the plain 12.5 inch squares to match the size of the monkey wrench blocks. Or, if you've waited until now to cut the plain squares, cut them the same size as you trimmed your monkey wrench blocks.)
Odd Rows 1, 3, 5, 7:
Block A, Plain Square, Block C, Plain Square, Block B
Even Rows 2, 4, 6:
Plain Square, Block B, Plain Square, Block C, Plain Square, Block A
Step 9 Stitch the blocks of each row together. Press seams of Row 1 to the right and press the seams of each successive row in the opposite direction of the previous row.
Stitch each row together.
Press the seam between rows upward toward Row 1.
Step 10 From four of the 10 (6 1/2 inch x WOF) strips piece the top borders and attach border strips to the main quilt column in the order noted on the quilt assembly diagram.
From the remaining 6 (6 1/2 inch x WOF) strips piece the side borders and attach border strips to the main quilt column in the order noted on the quilt assembly diagram.
Press seams toward border strips.
Finishing the Monkey Wrench Quilt Pattern
Batting
Batting: queen size (90 x 108 inches)
Backing
Backing: 3 yards of 108 inch wide backing fabric
Make the Quilt Sandwich
Put the money wrench quilt pattern quilt sandwich together by layering in this order the backing, batting and quilt top. Pin baste the three layers together.
Quilt the Quilt
Now quilt the three layers.
May I suggest a straight line quilting pattern of diagonal lines, first going from left to right and then going from right to left of the quilt. Make the grid lines about 2 inches apart.
Or, if you know how to free-motion quilt go for it!
Bind the Quilt
Binding Fabric: 3/4 yard fabric
From the 3/4 yard of fabric cut 10 (2 1/2 x 40 inch) strips and join to make a single long binding strip. (This pattern assumes you know how to bind, but binding instructions will be posted to the site at a later time.)
Monkey Wrench Quilt Pattern Complete
I really enjoyed designing this easy money wrench quilt pattern! Beginning quilters I hope you love making it.
Raid your stash for fabrics to make it your own.
Subscribe to the Quilt Blocks Digest newsletter for updates, special offers & exclusive content!
You will receive an email asking you to confirm your consent to subscribe. You must click on the confirmation link contained in that email in order to be subscribed and receive emails.
Your email address is never shared. Unsubscribe any time.


