Subscribe to the Quilt Blocks Digest newsletter for updates, special offers & exclusive content!
- Home
- Quilt Patterns
- Rail Fence
Rail Fence Quilt Pattern Tutorial for Beginners
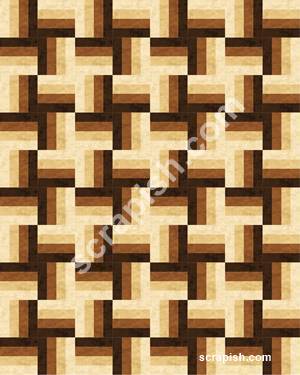
Use this 4 color rail fence quilt pattern (twin size) to make a quilt using 2 jelly rolls. Fabric requirements for queen and king sizes too!
There are many rail fence variations. One of my favorites is the pinwheel variation done in a single graduating color scheme.
All solid fabrics give this quilt design a more modern look, but I'm going to use a mixture of solids and prints from my stash.
Of course I'll need to cut my strips 2 1/2 inches wide, but if you use jellyrolls the hardest work is already done for you.
You can buy the needed jellyrolls in a monotone color scheme or in prints
that are of the same color family.
If you choose a jellyroll in print fabrics just arrange the fabric strips in four stacks: A=lightest, B=a little darker, C=darker and D=Darkest. You'll still get an effect of that shown in the pattern picture above.
Block Name: Rail Fence Quilt Block
Finished Block Size: 16 inch (made with four 8 inch units)
Setting: Straight-Set, 8 x 10 block units
Approximate Finished Quilt Size: 64 x 80 inches (fits twin size bed)
Fabrics for Twin Size Quilt Top
2 jelly rolls or yardage as follows
Fabric A - 1 1/2 yards (cream solid)
Fabric B - 1 1/2 yards (light tan print)
Fabric C - 1 1/2 yards (med brown solid)
Fabric D - 1 1/2 yards (dark brown print)
Yardage fabric requirements based on at least 42 inches usable fabric. Rounded to the nearest 1/4 yard.
Batting, Backing, Binding Fabrics
Batting: twin size (or 68 inches X 84 inches)
Backing: 2 yards of 108 inch wide backing fabric or 5 yards of 44 inch wide fabric
Binding Fabric: 3/4 yards
Yardage for queen size and king size rail fence quilts are given at the end of instructions below.
Rail Fence Quilt Pattern Instructions
- All seams are 1/4 inch unless otherwise noted.
- WOF = width of fabric
Cutting Fabric
If you are using jelly rolls your fabric is already cut. Simply separate the strips into 4 stacks and designate as follows:
- Fabrics A=lightest
- Fabrics B=a little darker
- Fabrics C=darker
- Fabrics D=darkest
All that is important is that they be laid out in light to dark order in 4 stacks.
If you use yardage, from each Fabric A, B, C, D cut
- 16 (2 1/2 inch x WOF) strips
Make Strip Sets
Note: To see step by step pictures of how to make a strip set and to stitch the rail fence quilt block units refer to the rail fence quilt block pattern.
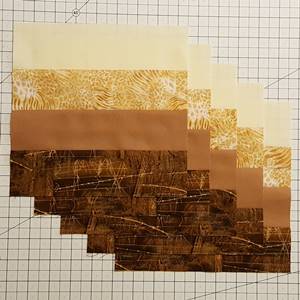
Step 1a Lay out 4 strips in Fabric A to D order and sew the strips together in pairs.
With right sides together place fabric D on top of fabric C with the selvage aligned on one end.
Align the right raw edges of the strips and place a few pins at the beginning of the strips and sew them together using a 1/4 inch seam along the right side of the strips.
Press the seam of towards the darker fabric.
Step 1b Repeat for strips B and A.
Step 1c With right sides together place D/C strips on top of strips B/A with the top selvage edges aligned.
Align the right raw edges and place a few pins at the beginning of the strips.
Sew the strips together using a 1/4 inch seam along the right side of the strips.
Press the seam towards the darker fabric. Open the strip set.

Cut the Rail Fence Block Units
Step 2a Cut a straight edge along the end with the selvages aligned. Cut close to the end so as to leave as much usable fabric as possible.

Step 2b Turn the strip set and align the straight edge with '0' (zero) line on your
cutting mat. Align the bottom edge of the strip set with a
horizontal line on the cutting mat. Line up the ruler along the 8 1/2 inch measurement on the cutting mat and the bottom straight edge of the strip set to make the cut.

Step 2c Cut 5 (8 1/2 inch) blocks from the strip set.

Step 3 Repeat Steps 1 and 2 to make 15 more strips sets for a total of 16. Cut a total of 80 blocks for a twin size rail fence quilt pattern.
Assemble Quilt Top
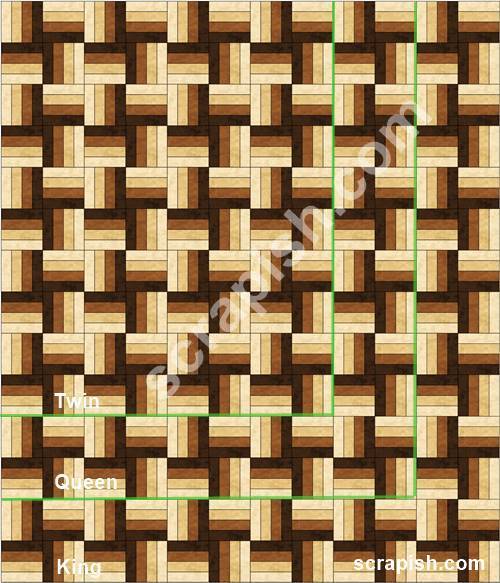
Refer to the rail fence quilt pattern quilt assembly diagram below.
Step 4 Layout the 8 1/2 inch rail fence blocks according to the assembly diagram for the twin size quilt...
- 8 blocks per row by 10 rows
4a Starting with Row 1, layout the first unit so that the strips are running vertically and the second unit so that they are running horizontally. Alternate the direction of each remaining unit in that row in the same manner.
4b For Row 2 place the first unit with the strips running horizontally and the second unit so that they are running vertically. Alternate the direction of each remaining unit in that row in the same manner.
4c Repeat 4a and 4b for each of the remaining rows until you have completed the layout.
You can see that the darkest and lightest fabrics form pinwheels.
 rail fence quilt assembly diagram
Step 5 Stitch the blocks of each row together, remembering to nest the seams. Pin if necessary.
Press seams that join the blocks in Row 1 to the right and press the seams of each successive row in the opposite direction of the previous row.
Step 6 Stitch each row together. Press the seam between rows upward toward Row 1.
Finishing Rail Fence Quilt Pattern
Twin Size
Batting: prepackaged twin size (or 68 inches X 84 inches)
Backing: 2 yards of 108 inch wide backing fabric or 5 yards of 44 inch wide fabric
Binding Fabric: From 3/4 yards cut 8 (2 1/2 inch) strips
Make the Quilt Sandwich
Step 7 Put the rail fence quilt pattern quilt sandwich together by layering in this order: backing, batting and quilt top. Pin baste the three layers together.
Quilt the Quilt
Step 8 Now quilt the three layers in your favorite quilting design.
By now you now my go to quilting designs are a simple grid pattern or a free-motion meandering stitch. But it's your quilt, you choose!
Bind the Quilt
Step 9 Join the strips cut for your binding to make a single long binding strip. Bind the quilt. (This pattern assumes you know how to bind, but binding instructions will be posted to the site at a later time.)
Rail Fence Quilt Pattern - Queen Size
Finished Block Size: 8 inch
Setting: Straight-Set, 10 blocks per row x 12 rows (see quilt assembly diagram above)
Approximate Finished Quilt Size: 80 x 96 inches (fits queen size bed)
3 jelly rolls or yardage as follows
Fabric A - 2 1/4 yards (cream solid)
Fabric B - 2 1/4 yards (light tan print)
Fabric C - 2 1/4 yards (med brown solid)
Fabric D - 2 1/4 yards (dark brown print)
Yardage fabric requirements based on at least 42 inches usable fabric. Rounded to the nearest 1/4 yard.
Cutting
Cut 24 strips from Fabrics A, B, C, D. Use 1 of each to make 24 strip sets.
Cut 120 (8 1/2 inch) units (5 per strip set).
Batting: prepackaged queen size (90 x 108 inches)
Backing: 3 yards of 108 inch wide backing fabric
Binding Fabric: From 3/4 yards cut 9 (2 1/2 inch) strips
Rail Fence Quilt Pattern - King Size
Finished Block Size: 8 inch
Setting: Straight-Set, 12 blocks per row x 14 rows (see quilt assembly diagram above)
Approximate Finished Quilt Size: 96 x 112 inches (fits king size bed)
Fabric
4 jelly rolls or yardage as follows
Fabric A - 3 yards (cream solid)
Fabric B - 3 yards (light tan print)
Fabric C - 3 yards (med brown solid)
Fabric D - 3 yards (dark brown print)
Yardage fabric requirements based on at least 42 inches usable fabric. Rounded to the nearest 1/4 yard
Cutting
Cut 34 strips from Fabrics A, B, C, D. Use 1 of each to make 34 strip sets.
Cut 168 (8 1/2 inch) units (5 per strip set) - you'll have 2 (8 1/2 inch) leftover units.
Batting: prepackaged queen size (90 x 108 inches)
Backing: 7 1/4 yards 44 inch fabric, pieced to 100 x 116
Binding Fabric: From 3/4 yards cut 9 (2 1/2 inch) strips
4 Color Rail Fence Quilt Pattern Complete
Though this pattern is easy enough for beginners, more experienced quilters may find it an enjoyable, relaxing design that maybe they never tried before.
Whichever size of this easy rail fence quilt pattern you choose to stitch up enjoy it!
Subscribe to the Quilt Blocks Digest newsletter for updates, special offers & exclusive content!
You will receive an email asking you to confirm your consent to subscribe. You must click on the confirmation link contained in that email in order to be subscribed and receive emails.
Your email address is never shared. Unsubscribe any time.


