Subscribe to the Quilt Blocks Digest newsletter for updates, special offers & exclusive content!
- Home
- How to Quilt
- Flying Geese 1 At a Time
Flying Geese Tutorial
Traditional flying geese units are used in lots of quilt blocks, especially star blocks. Learn how to make geese for quilts and get a size chart!

As a whole, the traditional geese unit is a rectangle. When looking at a completed unit it looks like it's made up of three triangles.
The larger triangle is the 'goose'. And the two smaller triangles make up the 'sky'.
Use any color combinations you choose. Rummage through your scrap bin and pick two different awesome fabrics.
For this tutorial, a solid (Fabric A) in a vibrant yellow and a plaid print (Fabric B) in primary colors are used.
Quilt Block Formula
Making geese units this way is called the corner triangle method. The height of the rectangle is half its length. Or, the rectangle is twice as long as it is tall.
For example, to make one 3 inch x 6 inch geese unit you need to cut one rectangle that measures 3 1/2 x 6 1/2 and two squares that measure 3 1/2 inches.
The math...
Size of Rectangle:
Height = 1/2 desired finished length + 1/2 inch seam allowance
by
Length = desired finished length + 1/2 inch seam allowance
Size of Squares:
height of desired finished flying geese + 1/2 inch seam allowance
Flying Geese Size Chart
|
Finished Geese Size (inches) |
Square Size (Unfinished) (inches) Cut 2 Fabric A (Sky) |
Rectangle Size (Unfinished) (inches) Cut 1 Fabric B (Goose) |
|
1 1/2 x 3 2 x 4 2 1/2 x 5 |
2 x 2 2 1/2 x 2 1/2 3 x 3 |
2 x 3 1/2 2 1/2 x 4 1/2 3 x 5 1/2 |
|
3 x 6 3 1/2 x 7 |
3 1/2 x 3 1/2 4 x 4 |
3 1/2 x 6 1/2 4 x 7 1/2 |
|
4 x 8 4 1/2 x 9 |
4 1/2 x 4 1/2 5 x 5 |
4 1/2 x 8 1/2 5 x 9 1/2 |
|
5 x 10 5 1/2 x 11 6 x 12 |
5 1/2 x 5 1/2 6 x 6 6 1/2 x 6 1/2 |
5 1/2 x 10 1/2 6 x 11 1/2 6 1/2 x 12 1/2 |
Start by cutting strips to the same width as the height of the unfinished rectangle and square size. Then, subcut for needed length of the unfinished rectangle or square.
How to Make a Flying Goose (or Flying Geese One-At-a-Time)
Technically speaking, if you make one flying geese unit it's called a flying goose.
Step 1 Cut Squares and Rectangle According to the size chart above choose a size and from Fabric A cut 2 squares. From Fabric B cut 1 rectangle.
On the wrong side of the squares, draw a diagonal line from one corner to corner.

Step 2 Place the rectangle right side up. Place one square right side down on top of the rectangle. Align it in the right hand corner of the rectangle with the diagonal line going from the center of the rectangle to the bottom right corner like a back slash (\).

Step 3 Place pins in the unit so the square will not shift when stitched. Stitch on the drawn line starting from the center of the rectangle to the bottom right corner.

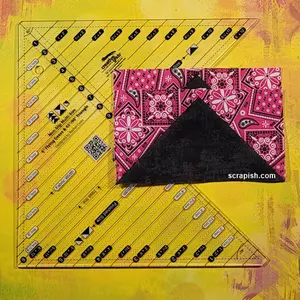
Step 4 Place the unit on a rotary cutting mat with square side facing up.
Place the quarter inch line of a quilting ruler on the stitched line. Use a rotary cutter to cut along the edge of the ruler, leaving a 1/4 inch seam.

Step 5 Flip the triangle (that resulted from cutting the square) face up. This triangle replaces the fabric that was cut away. Press the seam toward the triangle.

Step 6 With the rectangle right side up, place the second square right side down, aligning it in left hand corner of the rectangle with the diagonal line going from the center of the rectangle to the bottom left corner, like a forward slash (/).
Insert pins in the unit so the square will not shift when stitched.
Stitch on the drawn line from the center of the rectangle to the bottom right corner.

Step 7 Place the unit with square side facing up on a rotary cutting mat. Turn the rectangle if necessary to get a better angle to make the cut.
Place the quarter inch line of a quilting ruler on the stitched line. Use a rotary cutter to cut along the edge of the ruler, leaving a 1/4 inch seam.

Step 8 After making the cut, orient the unit so the rectangle is horizontal.

Step 9 Flip the triangle face up. Press the seam toward the triangle.
And, you have a completed flying geese unit!

Here's the backside of the flying geese. Notice the direction in which the seams are pressed.

Square Up Flying Geese
Step 10 Trim Sometimes it's necessary to trim off bits of fabric, or "square up" the unit. Use a quilting ruler to trim the flying geese to size (as shown here 3 1/2 x 6 1/2).
- Divide the unfinished length of the rectangle in half (6 1/2 inches / 2 = 3 1/4).
- With the large triangle pointing north, place that ruler measurement line on the unit where the two squares meet (or the point of the geese).
- Trim in excess fabric.
- Turn the unit clockwise two quarter turns, line up the ruler as before and trim.

Now you can use your flying geese units to make other quilt blocks or individually in a quilt!
Make Half Square Triangles from Left over Triangles
A happy surprise! Wondering what to do with the triangles you cut off?

Put them in your scrap bin as is. Or, stitch with a 1/4 seam to make half square triangles (HSTs) for use in a future quilt project!
You might like these
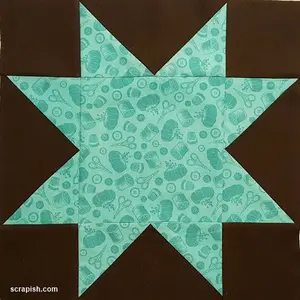
Star Quilt Block Pattern Tutorial - 12 Inch!
This easy star quilt block pattern (aka sawtooth star) makes an 8 point star using flying geese units and a square. Very beginner friendly!
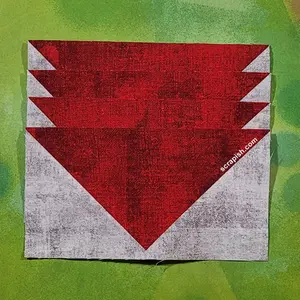
4 Flying Geese At Once Oversized Instructions
Make 4 flying geese at once oversized and trim without a specialty ruler. See a flying geese size chart too!
How to Make Flying Geese | Strip Quilting Technique
See how to make flying geese using half square and quarter square triangle rulers and strip quilting. No marking fabric or trimming!
Subscribe to the Quilt Blocks Digest newsletter for updates, special offers & exclusive content!
You will receive an email asking you to confirm your consent to subscribe. You must click on the confirmation link contained in that email in order to be subscribed and receive emails.
Your email address is never shared. Unsubscribe any time.
Recent Tutorials
-
Double Friendship Star Quilt Block Tutorial
Apr 05, 26 10:35 PM
 The double friendship star quilt block is easy to make. See step-by-step how and get fabric requirements for five sizes including 12 inch and bigger!
 -
Courthouse Steps Quilt Block Pattern Tutorial
Oct 23, 22 02:11 PM
See step-by-step how a courthouse steps quilt block pattern is stitched. It's a great companion block to use with star quilt blocks. -
Churn Dash Quilt Block Pattern Tutorial - 6 Inch, 9 Inch and 12 Inch
Jul 18, 22 07:11 PM
The churn dash quilt block looks difficult but is easy to piece. See step-by-step instructions with pictures. Get yardage for 3 sizes!


