Subscribe to the Quilt Blocks Digest newsletter for updates, special offers & exclusive content!
- Home
- How to Quilt
- How to Make Flying Geese
How to Make Flying Geese Using Strips
See how to make flying geese using half square and quarter square triangle rulers and strips. It's strip quilting - no marking fabric or trimming!

As you know flying geese units are used in a lot of different star quilt blocks. And, there are many ways to make flying geese.
In this flying geese quilt tutorial we will use what may look like a specialty quilt ruler. But, it is really a half square triangle and a quarter square triangle ruler in one.
Here's a handy tip: press the seams open. This makes for easier stitching later when using the flying geese to make star blocks.
Also, knowing how to make flying geese with strips saves time (in my opinion). You do not need to mark the fabric or trim the flying geese units!
Yes, you will deal with bias edges. But, remedy that by using a starch alternative spray.
Let's get started...
The Creative Grids (R) 6" Flying Geese and 45/90 Degree Triangle Ruler
 6\" Flying Geese and 45/90 Degree Triangle Ruler") Source: CreativeGridsUSA.com
Source: CreativeGridsUSA.comOne side of the ruler (in the photo above, the top half of the ruler) is quarter square triangle ruler. The other side (in the photo above, the bottom half of the ruler) is a half square triangle ruler.
You make the two sky units (smaller triangles) from the half square triangle side of the ruler. The goose (larger triangle) unit is made from the quarter square triangle side of the ruler.
You can also make flying geese using separate half square and quarter square triangle rulers (I have those too!). I like this ruler because it's two in one and makes up to 6 x 12" flying geese.
The fabric strip is cut to the same width whether making the goose or sky units.
Flying Geese Size Chart for Cutting Strips
|
Finished Geese Size (inches) A |
Size of Fabric Strips (inches) B |
Unfinished Geese Size (inches) C |
|
1 1/2 x 3 2 x 4 2 1/2 x 5 |
2 x WOF* 2 1/2 x WOF 3 x WOF |
2 x 3 1/2 2 1/2 x 4 1/2 3 x 5 1/2 |
|
3 x 6 3 1/2 x 7 |
3 1/2 x WOF 4 x WOF |
3 1/2 x 6 1/2 4 x 7 1/2 |
|
4 x 8 4 1/2 x 9 |
4 1/2 x WOF 5 x WOF |
4 1/2 x 8 1/2 5 x 9 1/2 |
|
5 x 10 5 1/2 x 11 6 x 12 |
5 1/2 x WOF 6 x WOF 6 1/2 x WOF |
5 1/2 x 10 1/2 6 x 11 1/2 6 1/2 x 12 1/2 |
You can use strips cut *width of fabric or shorter strips cut from scraps.
Making Flying Geese From HSTs and QSTs
Are you concerned about how to make flying geese using half square triangles (HST) and quarter square triangles (QST) because of their biased edges? Don't be. Simply use an alternative starch spray.
Spray it on and press the fabric before cutting strips from it. Then, when you cut the strips you have nice crisp fabric and lessen the chance of stretching the bias edges.
How to Make Flying Geese With Fabric Strips and Half Square Triangle and Quarter Square Triangle Rulers
Cut Half Square Triangles
Before we learn how to make flying geese we must cut the units.
First, you cut the half square triangles or sky units of the flying geese.
Refer to the cutting chart above for the width to cut your strips for the size flying geese block you want to make.
Step 1 Fold your strip of fabric in half with right sides (or wrong sides) together for mirror image half square triangles.
 together for mirror image half square triangles.")
Step 2 Align the half square triangle ruler's measurement line that is the same as the width of the fabric strip along the bottom of it and in about 1/4 inch from the right of the selvage edge. The blunt tip of the ruler aligns with the top edge of the fabric strip.

Step 3 Make a cut along both edges of the ruler. This results in two half square triangles (remember, the strip is doubled), enough for one flying geese unit.

Step 4 Rotate the ruler 180 degrees and align the angled side with the cut angle of the fabric strip. The ruler's measurement line is now at the top of the fabric strip and the blunt tip at the bottom of the strip.

Step 5 Make a cut along the straight side of the ruler. You now have two more half square triangle units.

Step 6 rotate the ruler again as done in Step 4 aligning the straight side of the ruler with the straight edge of the fabric strip. Make a cut along the angled edge of the ruler. Continue to rotate the ruler and make cuts as needed along the entire fabric strip.

Cut Quarter Square Triangles
How to make flying geese continues... Now, let's cut the quarter square triangles or goose units.
Step 7 We don't need mirror image quarter square triangles, but we do want to be efficient. When making multiple flying geese, fold the fabric strip in half with right sides together.

Step 8 Align the quarter square triangle ruler's measurement line that is the same width as the fabric strip along the bottom of it and in about 1/4 inch from the right of the selvage edge. The blunt tip of the ruler aligns with the top edge of the fabric strip.

Step 9 Make a cut along both sides of the quarter square triangle ruler.

Step 10 Rotate the ruler 180 degrees. Align the ruler's measurement line with the top of the fabric strip and the blunt tip with the bottom of the strip. Align the left edge of the ruler with the angled cut on the fabric strip. Make a cut along the right side edge of the quarter square triangle ruler.

Now that you have your pieces to make your flying geese block - two half square triangles (HST) and one quarter square triangle (QST) - we'll learn how to make flying geese.
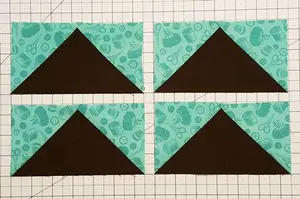
Step 11 Layout your pieces right side up with the QST in the middle and one HST on either side of it as shown in the photo below. The blunt tip of the QST points North. The blunt tip of each QST points South.

Step 12 Start with the HST on the right. Place it right side down on top of the QST, aligning the bottom and angled edges of both. The blunt tip of the HST will align about a 1/4 inch in from tip of the QST. Stitch a 1/4 inch seam.

Step 13 Flip the HST right side up and press the seam open.

Step 14 Place the left HST, right side down, on top of the QST, aligning the bottom and angled edges of both. The blunt tip of the HST aligns as before. The top edge of the HST overlaps the previously sewn HST. Stitch a 1/4 inch seam.

Step 15 Flip HST right side up. Press seam open.

Here's the backside of the flying geese unit with both seams pressed open. Pressing the seams open will result in less bulk in other seams when the flying geese units are used in other blocks such as star quilt blocks.

Step 16 Trim the dog ears from your flying geese units.

How to Make Flying Geese With Rulers and Strips
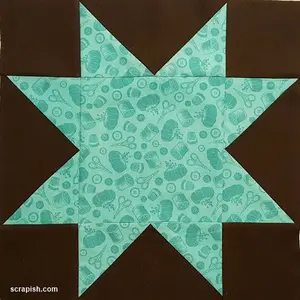
Now you know how to make flying geese using fabric strips and half square triangle and quarter square triangle rulers!Try making a sawtooth star quilt block.
In my opinion, this method saves time. There's no marking the back of your fabric and/or trimming flying is units!
Of course there are many ways to make flying geese and we each swear by our favorite method. :-) Knowing how to make flying geese multiple ways makes us smarter quilters!
You might like these
Star Quilt Block Pattern Tutorial - 12 Inch!
This easy star quilt block pattern (aka sawtooth star) makes an 8 point star using flying geese units and a square. Very beginner friendly!
4 Flying Geese At Once Oversized Instructions
Make 4 flying geese at once oversized and trim without a specialty ruler. See a flying geese size chart too!
No Waste Flying Geese Tutorial - Make 4 At a Time Fast!
No waste flying geese are easy to make! Learn the technique, see a size chart and make four at a time for fast flying geese.
Subscribe to the Quilt Blocks Digest newsletter for updates, special offers & exclusive content!
You will receive an email asking you to confirm your consent to subscribe. You must click on the confirmation link contained in that email in order to be subscribed and receive emails.
Your email address is never shared. Unsubscribe any time.
Recent Tutorials
-
Double Friendship Star Quilt Block Tutorial
Apr 05, 26 10:35 PM
 The double friendship star quilt block is easy to make. See step-by-step how and get fabric requirements for five sizes including 12 inch and bigger!
 -
Courthouse Steps Quilt Block Pattern Tutorial
Oct 23, 22 02:11 PM
See step-by-step how a courthouse steps quilt block pattern is stitched. It's a great companion block to use with star quilt blocks. -
Churn Dash Quilt Block Pattern Tutorial - 6 Inch, 9 Inch and 12 Inch
Jul 18, 22 07:11 PM
The churn dash quilt block looks difficult but is easy to piece. See step-by-step instructions with pictures. Get yardage for 3 sizes!


