Subscribe to the Quilt Blocks Digest newsletter for updates, special offers & exclusive content!
- Home
- How to Quilt
- No Waste Flying Geese 4 At a Time
No Waste Flying Geese Tutorial
Make four no waste flying geese at a time. Learn the technique and see a size chart. Easy enough for beginners and fast!

There are times when you want to make more than one flying geese at a time. You want to make multiple geese at a time!
This method results in four geese that do not need to be trimmed to size. You only need to trim off the 'wing tips' (you'll see this in the instructions below).
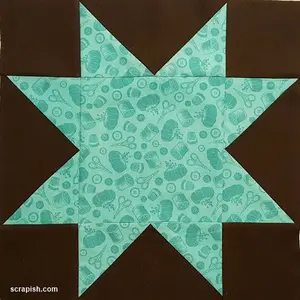
The Eight Pointed Star quilt block is a prime example of when you might want to make flying geese four at a time (there will be a link to this block at the end of this tutorial).
There are many quilting rulers available on the market for purchase to make more than one flying geese at a time. However, if you are on a budget buying a ruler may not be feasible.
Flying Geese Math
But, if you know the math, a specific ruler may be unnecessary.
Using this method requires 5 squares in two different sizes - 1 large square and 4 smaller squares - to make four flying geese rectangle units.
The math is...
Small Squares Size: Add 7/8 inch to the shorter side of the finished size of your flying geese unit.
Large Square Size: Add 1 1/4 inches to the longer side of the finished size of your flying geese unit.
Fast No Waste Flying Geese Chart
Here's the math, already done!
|
Finished Geese Size (inches) |
Unfinished Small Square Size (inches) Cut 4 Fabric A |
Unfinished Large Square Size (inches) Cut 1 Fabric B |
|
1 1/2 x 3 2 x 4 2 1/2 x 5 |
2 3/8 x 2 3/8 2 7/8 x 2 7/8 3 3/8 x 3 3/8 |
4 1/4 x 4 1/4 5 1/4 x 5 1/4 6 1/4 x 6 1/4 |
|
3 x 6 3 1/2 x 7 |
3 7/8 x 3 7/8 4 3/8 x 4 3/8 |
7 1/4 x 7 1/4 8 1/4 x 8 1/4 |
|
4 x 8 4 1/2 x 9 |
4 7/8 x 4 7/8 5 3/8 x 5 3/8 |
9 1/4 x 9 1/4 10 1/4 x 10 1/4 |
|
5 x 10 5 1/2 x 11 6 x 12 |
5 7/8 x 5 7/8 6 3/8 x 6 3/8 6 7/8 x 6 7/8 |
11 1/4 x 11 1/4 12 1/4 x 12 1/4 13 1/4 x 13 1/4 |
Start by cutting strips the same width as the size of the unfinished squares. Then, subcut to the size of the unfinished squares.
How to Make Four No Waste Flying Geese Instructions
Step 1a Cut Squares and Rectangle According to the measurement chart above...
Cut 1 large square from Fabric B (solid brown).
Cut 4 small squares from Fabric A (green print).
Step 1b Mark Small Squares On the wrong side of the small squares, draw a diagonal line from one corner to the opposite corner.

Step 2 Place the large square right side up and on point (oriented like a diamond shape) onto a flat surface. Your cutting mat is perfect.
Place 1 small square, right side down, in the top corner of the large square with the diagonal line running from the top corner to the center of the large square. Pin the smaller square to the larger one so it won't shift when you sew it.

Refer to above photo. Place a second small square, right side down, in the bottom corner of the large square with the diagonal line running from the bottom corner to the center of the large square. Pin.
The overlap of the small squares in the center is fine. You want this. The diagonal lines should line up with one another.
No waste flying geese in the making...
Step 3 Stitch a seam 1/4 inch on both sides of the drawn line.

Step 4 Place the unit, with large square on bottom, onto your cutting mat.
Place a quilting ruler on the drawn line. Use a rotary cutter and cut on the line, splitting the unit into two halves, leaving a 1/4 inch seam on both halves.

Can you see how the 4 no waste flying geese units will be made? :-)
Let's continue...
Step 5 Flip the small triangles right side up and press the seams toward the small triangles.

Step 6 With the large triangle and small triangles units right side up, place 1 small square, right side down, in the remaining 'unused' corner of each of the large triangles. The drawn diagonal line should run from the unused' corner through the center of the large triangle and overlap where the two smaller triangles meet.
Pin the smaller squares to the larger triangles.
Stitch a seam 1/4 inch on both sides of the drawn line.

Step 7 Place the units (with small squares on top) onto a rotary cutting mat. Orient the units if necessary to get a better angle to make the cut.
Place a quilting ruler on the drawn line. Use a rotary cutter to cut both units into two units.

Step 8 Flip the triangles face up. Press the seam toward the small triangles.
You have made four no waste flying geese units at one time!

Step 9 Trim the dog ears. You should not need to "square up" the flying geese units.

Finished! Told ya it would be easy, and fast! :-)
Now you can use your no waste flying geese units in quilt blocks! Try making a sawtooth star quilt block pattern.
You might like these
Star Quilt Block Pattern Tutorial - 12 Inch!
This easy star quilt block pattern (aka sawtooth star) makes an 8 point star using flying geese units and a square. Very beginner friendly!
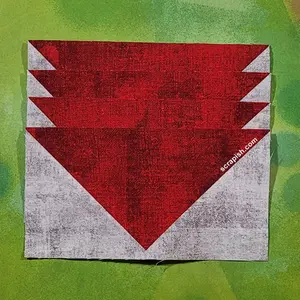
4 Flying Geese At Once Oversized Instructions
Make 4 flying geese at once oversized and trim without a specialty ruler. See a flying geese size chart too!
How to Make Flying Geese | Strip Quilting Technique
See how to make flying geese using half square and quarter square triangle rulers and strip quilting. No marking fabric or trimming!
Subscribe to the Quilt Blocks Digest newsletter for updates, special offers & exclusive content!
You will receive an email asking you to confirm your consent to subscribe. You must click on the confirmation link contained in that email in order to be subscribed and receive emails.
Your email address is never shared. Unsubscribe any time.
Recent Tutorials
-
Double Friendship Star Quilt Block Tutorial
Apr 05, 26 10:35 PM
 The double friendship star quilt block is easy to make. See step-by-step how and get fabric requirements for five sizes including 12 inch and bigger!
 -
Courthouse Steps Quilt Block Pattern Tutorial
Oct 23, 22 02:11 PM
See step-by-step how a courthouse steps quilt block pattern is stitched. It's a great companion block to use with star quilt blocks. -
Churn Dash Quilt Block Pattern Tutorial - 6 Inch, 9 Inch and 12 Inch
Jul 18, 22 07:11 PM
The churn dash quilt block looks difficult but is easy to piece. See step-by-step instructions with pictures. Get yardage for 3 sizes!


