Subscribe to the Quilt Blocks Digest newsletter for updates, special offers & exclusive content!
- Home
- Other Quilt Blocks
- 8 Point Star
Star Quilt Block Pattern Tutorial
This is an easy 8 point star quilt block pattern (aka sawtooth star quilt block). Use flying geese units and a square to make a beginner friendly 12 inch block size!

This star quilt block is known as the Eight Point Star or Square and Points. We can clearly see why!
Quilters love star blocks! But, they can be tricky for beginners. Getting crisp points is sometimes difficult.
However, the way that this star block is constructed solves most of that. It's made with squares, not diamonds - a favorite among some experienced quilters.
Yeah, you see some triangles in the block shown above. But, they are all made from squares. Yes, believe it! :-)
To make the flying geese that you see we will use the No Waste Flying Geese method, which makes four flying geese at a time!
In this tutorial, we are going to make a 12 inch star block using two contrasting fabrics...
- Fabric A = print (green)
- Fabric B = background (brown solid)
8 Point Star Block Layout
The block is laid out in 3 rows and 3 columns, just like a traditional nine patch quilt block.
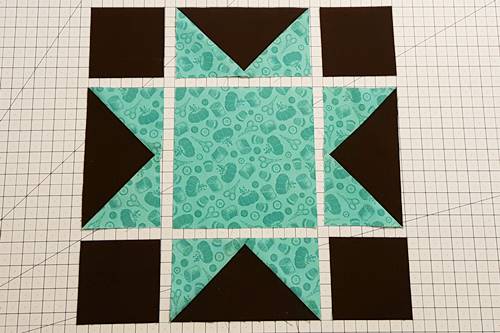
The 9 units that make up the block are
- Row 1: small square, flying geese, small square
- Row 2: flying geese, large square, flying geese
- Row 3: small square, flying geese, small square
8 Point Star Quilt Block Pattern Instructions
Step 1a Cut Fabric For Flying Geese Units.
How to make flying geese 4-at-a-time is shown on another page (this page would be too long if shown here). Before you head over there we need to first cut the fabric to make the geese...
Cut 1 (7 1/4 inch) square from Fabric B and
Cut 4 (3 7/8 inch) squares from Fabric A

Step 1b Make 4 Flying Geese. Now, head over and make 4 geese units using the no waste flying geese method (for your convenience, a new page will open). Then, come back here to make the star quilt block pattern.
Step 1c Cut Fabric for Remaining Squares.
From Fabric B, cut 4 (3 1/2 inch) small squares
From Fabric A, cut 1 (6 1/2 inch) large square.
Step 2 Layout star block as shown below. Can you see the sawtooth star quilt block pattern?
Step 3a Stitch units of Row 1 together. With right sides together, place the flying geese on top of the first square. Pin to secure.

Step 3b Sew the units together using a 1/4 inch seam along the right side of the units.

Step 3c Fold the flying geese unit back right side up. Finger press the seam towards the square. With right sides together, place second square on top of flying geese unit along its right edge, aligning raw edges. Pin if desired. Stitch the two together using a 1/4 inch seam.

Step 3d Fold the square back right side up. Finger press the seam towards the square. Row 1 units are now sewn together.

Step 4 Note: Before we stitch the units of Row 2 together, take note. At the sewing machine, orient the pieces so that you are able to stitch with the flying geese units on top.
See where the first two threads intersect on the flying geese unit?
When you stitch the large square to the flying geese unit, be sure to stitch to the right of where the two previously sewn threads intersect. This will prevent you from stitching over your point.

Step 4a Stitch units of Row 2 together. With right sides together, place the large square on top of the flying geese unit. Pin to secure, if desired. Stitch the two together using a 1/4 inch seam.
Fold back the large square right side up. Finger press the seam towards the square.
With right sides together, place second flying geese on top of square unit along its right edge, aligning raw edges. Pin if desired. Stitch the two together using a 1/4 inch seam.
Fold back the flying geese unit right side up. Finger press the seam towards the square.

Step 5 Sew the units of Row 3 together (see above photo) as done in Steps 3a - 3d.
Step 6 Take the rows to the ironing board and press the seams (not pictured). For flatter seams, use a starch alternative pressing solution such as Mary Ellen's Best Press (TM) if desired.
Step 7a Now sew the rows of the star quilt block pattern together.
Place Row 1 over Row 2 with right sides together. The bottom of Row 1 should be sewn to the top of Row 2.
Match up and nest the seams. Pin on both sides of each seam as well as at each end of the row.

Step 7b Stitch Rows 1 and 2 together using a 1/4 inch seam. Press the seam toward the flying geese unit.

Step 7c Now sew Row 3 to Row 2 in the same manner. The the top of Row 3 should be sewn to bottom of Row 2 . Press the seam downward, toward row 3.

Step 7d Once the block is sewn together, take it to the ironing board and give it a final press. Here's the backside of the star quilt block pattern. You can see how the seams are pressed.

This block is easily made in other sizes. Just cut the large center square the same size as the unfinished length of the flying geese and cut the small squares the same size as the unfinished height of the flying geese. Use this flying geese size chart and tutorial for making 4 geese at a time. Perfect for making star blocks!
And, if you're making the star quilt pattern you'll need to make lots of geese!
You might like these
4 Flying Geese At Once Oversized Instructions
Make 4 flying geese at once oversized and trim without a specialty ruler. See a flying geese size chart too!
Sawtooth Star Quilt Block Pattern Tutorial
The sawtooth star quilt block is popular with many variations! See double and expanding variations and how to press for a less bulky, flatter block.
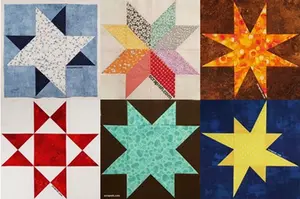
Easy Star Quilt Blocks in 12 Inch Size
Beginners, use these easy star quilt blocks to make simple yet beautiful star quilts. See each block used in a star quilt pattern.
Subscribe to the Quilt Blocks Digest newsletter for updates, special offers & exclusive content!
You will receive an email asking you to confirm your consent to subscribe. You must click on the confirmation link contained in that email in order to be subscribed and receive emails.
Your email address is never shared. Unsubscribe any time.
Recent Tutorials
-
Double Friendship Star Quilt Block Tutorial
Apr 05, 26 10:35 PM
 The double friendship star quilt block is easy to make. See step-by-step how and get fabric requirements for five sizes including 12 inch and bigger!
 -
Courthouse Steps Quilt Block Pattern Tutorial
Oct 23, 22 02:11 PM
See step-by-step how a courthouse steps quilt block pattern is stitched. It's a great companion block to use with star quilt blocks. -
Churn Dash Quilt Block Pattern Tutorial - 6 Inch, 9 Inch and 12 Inch
Jul 18, 22 07:11 PM
The churn dash quilt block looks difficult but is easy to piece. See step-by-step instructions with pictures. Get yardage for 3 sizes!


