Subscribe to the Quilt Blocks Digest newsletter for updates, special offers & exclusive content!
- Home
- Quilt Patterns
- 8 Point Sawtooth Star
8 Point Sawtooth Star Quilt Pattern
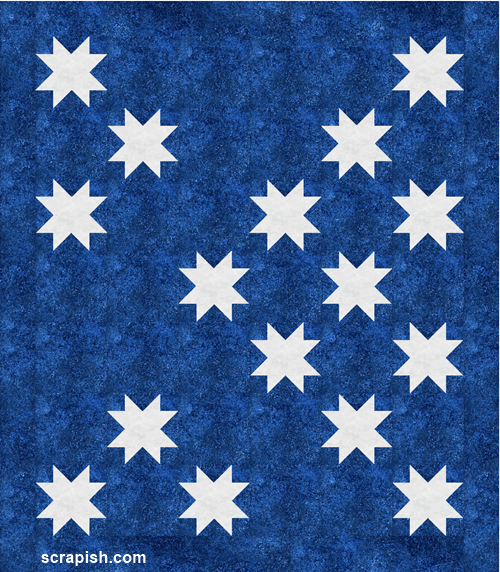
This 8 point star quilt pattern is really a sawtooth star quilt pattern. It uses 12 inch quilt blocks. Beginners, it's easy and fun!

We quilters love star quilts! And, the easier the stars are to make all the better.
Though I designed this quilt with a single background fabric and a different single fabric for the stars you can make it scrappy.
To make this design look more like a scrap quilt, use several different shades of blue for the background and several shades of light gray and or white fabrics to make the stars.
The quilt is made simply with plain squares, large and small, and flying geese. So, you can change up the pattern easily by making more or fewer star blocks and plain background squares.
Pretty much the only difficult part of this quilt is making sure that you do not cut off your star points by sewing over them.
But, I will show you the solution to that as you stitch the flying geese to the center squares of the star blocks.
Block Name: Eight Point Star Quilt Block
Finished Block Size: 12 inch
Setting: Straight-Set, 6 x 7 blocks
Approximate Finished Quilt Size: 84 x 96 inches
Fabrics for Quilt Top
In addition to your usual quilting supplies here are your fabric requirements, based on 42 inches usable fabric.
Rounded to the nearest 1/4 yard.
1 1/4 yard Fabric A - light gray (or white), mottled
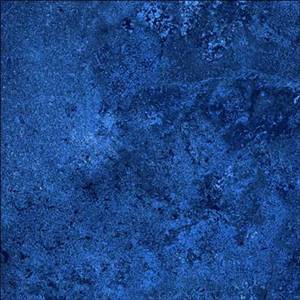
6 1/4 yard Fabric B* - dark blue, mottled
*Assumes that you will piece border strips.
Backing, Binding, Batting Fabrics
Backing: 3 yards of 108 inch wide backing fabric
Binding Fabric: 3/4 yards
Batting: prepackaged queen size (or 88 inches X 100 inches)
Prerequisites
Eight Point Star Quilt Pattern
- All seams are 1/4 inch unless otherwise noted.
- WOF = width of fabric
Cut Fabric for Units
If you prefer to cut all of your fabric at once, here's what you need to cut. The quilt pattern instructions will also direct you went to cut what fabric and shape.
From Fabric A- light gray (or white), mottled cut:
3 (6 1/2 inch by WOF) strips; subcut 16 (6 1/2 inch) squares for center squares of star blocks
7 (3 7/8 inch by WOF) strips; subcut 64 (3 7/8 inch) squares to make 4-At-a-Time Flying Geese
From Fabric B - dark blue, mottled (or several different shades of blue fabrics) cut:
9 (12 1/2 inch x WOF) strips; subcut 26 (12 1/2 inch) for Block B (Alternate Squares)
6 (3 1/2 inch by WOF) strips; subcut 64 (3 1/2 inch) for Corner Squares of star blocks
4 (7 1/4 inch by WOF) strips; subcut 16 (7 1/4 inch) squares to make 4-At-a-Time Flying Geese
10 (6 1/2 inch x WOF) strips for borders
8 Point Star Quilt Pattern Instructions
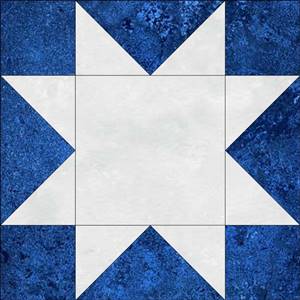
First, we will make the Eight Point Star block (aka sawtooth star quilt block) as shown below. Each 12 inch star block uses
- 1 (6 inch) center square
- 4 (3 inch) corner squares
- 4 (3 by 6 inch) flying geese
 Block A: Eight Point Star Block
Step 1a: Cut Fabric for 64 Flying Geese
From Fabric A- light gray (or white), mottled cut:
7 (3 7/8 inch by WOF) strips; subcut 64 (3 7/8 inch) squares to make 4-At-a-Time Flying Geese.
From Fabric B - dark blue, mottled (or several different shades of blue fabrics) cut:
4 (7 1/4 inch by WOF) strips; subcut 16 (7 1/4 inch) squares to make 4-At-a-Time Flying Geese.
Step 1b: Make 64 Flying Geese
Make 64 flying geese using the 4-At-a-Time No Waste Flying Geese method (opens a new window). To make 4 flying geese rectangle units at a time use:
- 4 (3 7/8 inch) squares (Fabric A - light gray or white, mottled)
- 1 (7 1/4 inch) square (Fabric B - dark blue, mottled)
Step 1c: Make 16 Eight Point Star Blocks (Block A)
Layout and stitch together 16 (12 1/2 inch) 8 Point Star quilt blocks (opens in a new window).
Step 1d: Trim all the star blocks to 12 1/2 inches, or the size of the smallest block, which may be a little less than 12 1/2 inches.
Step 2: Cut Block B (Alternate Squares)
Using the 9 (12 1/2 inch x WOF) strips, subcut 26 (12 1/2 inch) squares (Block B). Or, subcut the squares to the same size as you trimmed all of the blocks to in Step 1d.
 Block B: 12 1/2 inch Square
Note: When Cutting/Piecing Long Strips
For the border strips, the exact measurements for the pattern are given. To account for variations that can occur in cutting and stitching, piece together each strip about 2 - 3 inches longer than specified and trim each to size after attaching it to the main quilt body.
Step 3a: Cut Fabric for Border Strips
If you have enough yardage you can cut the border strips by the width of the fabric (WOF)...
Cut from Fabric B - dark blue, mottled (or several different shades of blue fabrics) a total of:
10 (6 1/2 inch x WOF) strips.
Or, use scraps to piece the strips together in the length stated in Step 3b below.
Step 3b: Piece Border Strips
The approximate finished size of the quilt is 84 x 96 inches.
Whether from yardage or scraps, stitch together 2 (6 1/2 x 84 inch) strips and 2 (6 1/2 x 96 inch) strips.
8 Point Sawtooth Star Quilt Pattern
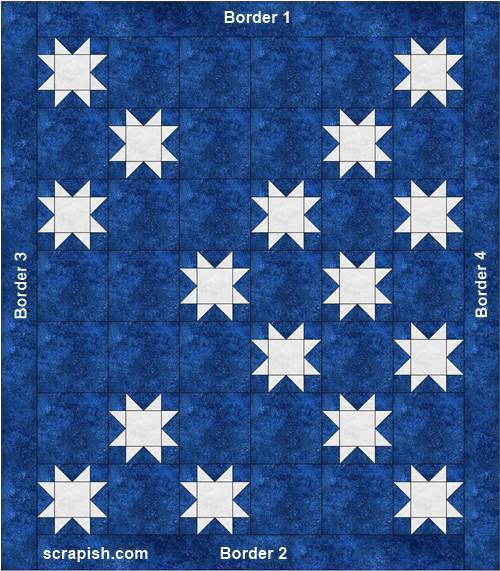
Quilt Assembly Diagram
 star quilt assembly diagram
For the steps below, refer to the above 8 Point Star quilt pattern quilt assembly diagram.
Step 4: Layout the 12 1/2 inch star quilt blocks and plain 12 1/2 inch squares as shown...
Row 1: Star, 4 Plain Squares, Star
Row 2: Plain Square, Star, 2 Plain Squares, Star, Plain Square
Row 3: Star, 2 Plain Squares, Star, Plain Square, Star
Row 4: 2 Plain Squares, Star, Plain Square, Star, Plain Square
Row 5: 3 Plain Squares, Star, Plain Square, Star
Row 6: Plain Square, Star, 2 Plain Squares, Star, Plain Square
Row 7: Star, Plain Square, Star, 2 Plain Squares, Star
Or, arrange the blocks in a pattern to your liking.
Step 5a: Stitch the blocks of each row together. Press seams of Row 1 to the right and press the seams of each successive row in the opposite direction of the previous row.
Step 5b: Stitch each row together. Press the seam between rows downward.
Step 6: Attach Border Strips
Attach border strips to the main quilt body in the order shown on the star quilt pattern quilt assembly diagram. Press seams toward border strips.
Finishing the 8 Point Sawtooth Star Quilt Pattern
Batting
Batting: queen size (cut to 88 x 100 inches)
Backing
Backing: 3 yards of 108 inch wide backing fabric (cut to 92 x 104 inches)
Step 7: Make the Quilt Sandwich
Put the star quilt pattern quilt sandwich together by layering in this order the backing, batting and quilt top. Pin baste the three layers together.
Step 8: Quilt the Quilt
Now quilt the three layers.
May I suggest a straight line quilting pattern of diagonal lines, first going from left to right and then going from right to left of the quilt. Make the grid lines about 2 inches apart.
Or, if you know how to free-motion quilt go for it!
Step 9: Bind the Quilt
Binding Fabric: 3/4 yard fabric
From the 3/4 yard of fabric cut 10 (2 1/2 x WOF) strips, trim selvages and join to make a single long binding strip.
Easy Star Quilt Pattern Complete
This 8 Point Sawtooth Star quilt pattern is easy to make! Beginners and experienced quilters alike, I hope you have fun making it.
Raid your fabric stash and really make it your own!
Updated: March 26, 2019
Subscribe to the Quilt Blocks Digest newsletter for updates, special offers & exclusive content!
You will receive an email asking you to confirm your consent to subscribe. You must click on the confirmation link contained in that email in order to be subscribed and receive emails.
Your email address is never shared. Unsubscribe any time.


