Subscribe to the Quilt Blocks Digest newsletter for updates, special offers & exclusive content!
- Home
- Very Easy Star Blocks
- Sawtooth Star
Sawtooth Star Quilt Block Pattern Tutorial
The ever popular sawtooth star quilt block is easy to make. Use two sizes in the same block to make two different double sawtooth star variations!

The sawtooth star block is made up of a large center square, four flying geese and four corner squares.
And, if you have made flying geese before you know that they are made up of two half square triangles and one quarter square triangle. Perfect for using rulers and strips!
You probably know at least two or three ways to make flying geese. In this tutorial, we will make them using fabric strips and quarter square triangle and half square triangle rulers.
No marking required!
Sawtooth Star Quilt Block Size Cutting Chart
In this tutorial, we use two contrasting fabrics designated as...
- Fabric A = star points (or sky units) and center square (fushcia bandana print)
- Fabric B = background (or goose) and corner squares (tone on tone black print(s))
6 Inch Finished Size Block (6 1/2 unfinished size)
Make 4 (1 1/2 x 3) inch finished size (unfinished size is 2 x 3 1/2 inch) flying geese using half square triangle and quarter square triangle rulers...
Cut two fabric strips:
- Fabric A: 2 x 14 inch strip; subcut 8 (2 inch) HSTs
- Fabric B: 2 x 20 inch strip; subcut 4 (2 inch) QSTs
For center and corner squares cut...
- Fabric A: 1 (3 1/2 x 3 1/2) inch square (center)
- Fabric B: 4 (2 x 2) inch squares (corners)
12 Inch Finished Size Block (12 1/2 unfinished size)
Make 4 (3 x 6) inch finished size (unfinished size is 3 1/2 x 6 1/2 inch) flying geese using half square triangle and quarter square triangle rulers...
Cut two fabric strips:
- Fabric A: 3 1/2 x 20 inch strip; subcut 8 (3 1/2 inch) HSTs
- Fabric B: 3 1/2 x 23 inch strip; subcut 4 (3 1/2 inch) QSTs
For center and corner squares cut...
- Fabric A: 1 (6 1/2 x 6 1/2) inch square (center)
- Fabric B: 4 (3 1/2 x 3 1/2) inch squares (corners)
Sawtooth Star Quilt Block Pattern Instructions
Step 1 Make four (4) flying geese using your favorite method or make flying geese using strips and a HST and a QST ruler as I did and press the seams open.
 flying geese using your favorite method.")
Other methods on scrapish.com for making flying geese are
Step 2 Layout the sawtooth star quilt block as noted and shown below.
- Row 1: small square, flying geese, small square
- Row 2: flying geese, large square, flying geese
- Row 3: small square, flying geese, small square

Step 3 With right sides together and a 1/4 inch seam, stitch together the units of each row.
Rows 1 and 2: Place the flying geese on top of the first small square, aligning raw edges. Stitch. Press seam toward square.
Flip flying geese unit right side up. Place second small square on top of flying geese, aligning raw edges. Stitch. Press seam toward square.
Row 3: Place the large square on top of the first flying geese, aligning raw edges. Stitch. Press seam toward square.
Flip large square right side up. Place flying geese on top of large square, aligning raw edges. Stitch. Press seam toward square.

Step 4 Stitch the rows of the sawtooth star quilt block to one another.
With right sides together flip Row 1 onto Row 2 (the bottom of Row 1 should be sewn to the top of Row 2), aligning raw edges.
Match up and nest seams. Pin if desired. Stitch.
With right sides together flip Row 3 onto Row 2 (the top of Row 3 should be sewn to the bottom of Row 2), aligning raw edges.
Match up and nest seams. Pin if desired. Stitch.

Step 5 Press the seams toward Row 2.

Your sawtooth star quilt block is finished!
Sawtooth Star Seams
Look at the backside of the sawtooth star quilt block pattern to see how the seams are pressed.
- The seams of the flying geese are pressed open.
- The seams around the center square are pressed towards the center.
- The seams between the flying geese and the corner squares are pressed towards the corner squares.

As a result the sawtooth star quilt block lies flat.
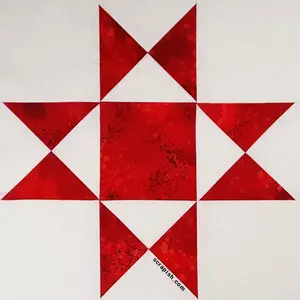
Sawtooth Star Variations
The center square of a sawtooth star quilt block is ideal for using other blocks to change the look of the sawtooth star.
You may want to replace the plain center square with a
Below are two variations that use a smaller sawtooth star as the center square. Both could be called a double sawtooth star, but I have dubbed one double and the other radiating (or expanding).
Double Sawtooth Star
For a 12 inch double sawtooth star simply make a 6 inch sawtooth star and surround it with 4 (3 x 6) inch flying geese and 4 (3 x 3) inch squares.

For both sizes designate the same fabrics for Fabric A and B.

Radiating (or Expanding) Sawtooth Star
For a radiating (expanding) sawtooth star make a 6 inch sawtooth star. Use one color for the center square and the star points (flying geese sky units).
Use a second color for the corner squares and the background, or goose units.
 sawtooth star quilt block layout.")
Here's the radiating (expanding) sawtooth star quilt block stitched together. Beautiful!
 sawtooth star quilt block stitched together.")
You might like these
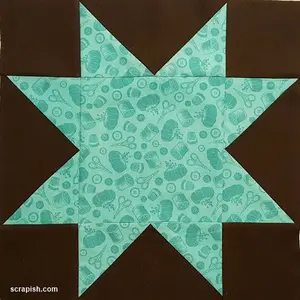
Star Quilt Block Pattern Tutorial - 12 Inch!
This easy star quilt block pattern (aka sawtooth star) makes an 8 point star using flying geese units and a square. Very beginner friendly!
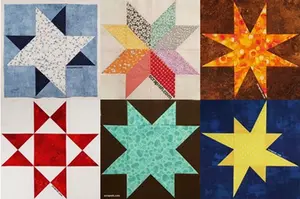
Easy Star Quilt Blocks in 12 Inch Size
Beginners, use these easy star quilt blocks to make simple yet beautiful star quilts. See each block used in a star quilt pattern.
Ohio Star Quilt Block Made Easy and Fast, Even for Beginners
Ohio star quilt block directions using a quarter square triangle ruler. No lines to mark and very little trimming makes making a quilt faster.
Subscribe to the Quilt Blocks Digest newsletter for updates, special offers & exclusive content!
You will receive an email asking you to confirm your consent to subscribe. You must click on the confirmation link contained in that email in order to be subscribed and receive emails.
Your email address is never shared. Unsubscribe any time.
Recent Tutorials
-
Double Friendship Star Quilt Block Tutorial
Apr 05, 26 10:35 PM
 The double friendship star quilt block is easy to make. See step-by-step how and get fabric requirements for five sizes including 12 inch and bigger!
 -
Courthouse Steps Quilt Block Pattern Tutorial
Oct 23, 22 02:11 PM
See step-by-step how a courthouse steps quilt block pattern is stitched. It's a great companion block to use with star quilt blocks. -
Churn Dash Quilt Block Pattern Tutorial - 6 Inch, 9 Inch and 12 Inch
Jul 18, 22 07:11 PM
The churn dash quilt block looks difficult but is easy to piece. See step-by-step instructions with pictures. Get yardage for 3 sizes!


