Subscribe to the Quilt Blocks Digest newsletter for updates, special offers & exclusive content!
- Home
- Other Quilt Blocks
- Log Cabin
Log Cabin Quilt Block Pattern Tutorial
This easy log cabin quilt block uses 2 1/2 inch strips. Use your charm packs too. Beginners, get out your jelly rolls and start quilting today!

This is a very easy block. Beginners, you will absolutely love the log cabin block! It's a traditional quilt block.
You start with a center square, usually red. This represents the hearth or fireplace which was usually found in every pioneer's home.
Next, you add logs, or strips of fabric, around each side of the square.
You can start adding the logs at any position around the square.
But, the norm is to start at the bottom (6 o'clock position) or right side (3 o'clock position) and add strips of fabric in a counterclockwise direction.
This block is really easy to make when you use a jelly roll (2 1/2 inch strips). They are already cut and ready to use. And, you get a big block!
The traditional log cabin quilt block has a light side and a dark side.
When buying jelly rolls or selecting them from your stash consider rolls that have both light and dark fabrics.
Let's get started!
Quilt Block Fabrics
1 jelly roll with light and dark fabrics
1 (2 1/2 inch x WOF) strip of red fabric (jelly roll strip or cut from yardage)
Quilt Block Assembly Diagram
Take a look at this quilt block assembly diagram. It shows you the order in which to stitch the logs to and around the center square.
 Log Cabin Quilt Block Assembly Diagram
The center square is labeled 'center'. The logs are numbered 1 - 12. Think of the sides of the center square as the 3 o'clock (right side), 6 o'clock (bottom), 9 o'clock (left side) and 12 o'clock (top) positions on a clock.
For this log cabin block, stitch the first log (1) to the center at the 6 o'clock position. Then proceed counterclockwise around the center.
Refer to this diagram as needed while you assemble your block.
Quilt Block Measurements
Round 1: center square + 1 log round = 6 1/2 inches square
Round 2: center square + 2 log rounds = 10 1/2 inches square
Round 3: center square + 3 log rounds = 14 1/2 inches square
As a bonus, I will show you two ways to get a 12 inch log cabin block. (Sweet!)
Log Cabin Quilt Block Instructions
Step 1 Separate the strips of fabric into two piles: light fabrics and dark fabrics.

There's no real science to doing this. I simply used the color of the
background fabric to decide. If my strip of fabric had a dark
background, I put it in the dark pile.
If the strip of fabric had a light background color, I put it in the light pile.
My block has a scrappy look which I just adore!
Step 2 Cut 1 (2 1/2 inch x WOF) strip from red fabric yardage, or use a red jelly roll strip (not pictured).
Step 2a Subcut 1 (2 1/2 inch) square from red 2 1/2 inch strip. This is the center of the log cabin quilt block.

Step 3a Choose a light fabric strip. Place it, vertically right side up onto your cutting mat.
Place the red 2 1/2 inch square, right side down, on top of the jellyroll strip, near the top end of it.

Step 3b Sew the square to the strip using a 1/4 inch seam along the right side of the two.

Step 3c Use a ruler to trim the excess fabric from one side of the square.

Step 3d Use a ruler to trim the excess fabric from the other side of the square.

Step 3e Open the squares with the right sides up. Ensure that the second square (log 1) is in the 6 o'clock position (1 on the block assembly diagram).
Finger press the seam away from the center square.

Step 4a Choose a light fabric strip (can be the same print fabric strip or a different light strip). Place it, vertically right side up onto your cutting mat.
Place center square/1st log unit, right side down, on top of the jellyroll strip, near the top end of it.

At your sewing machine, lead with the log just sewn. Meaning, put the last log sewn under the needle first. Sew the unit to the strip using a 1/4 inch seam along the right side of the strips.
Step 4b Use a ruler to trim the excess fabric from both sides of the center square/1st log unit, as done in Steps 3c and 3d.

Step 4c Open the units with the right sides up. Ensure that log 2 is in the 3 o'clock position (2 on the block assembly diagram).
Finger press the seam toward the log.

Step 4d Now stitch the first dark log to the 12 o'clock position (3 on the block assembly diagram) of the center square/light log unit.
Choose a dark fabric strip. Place it, vertically right side up onto your cutting mat.
Place center square/light log unit, right side down, on top of the jellyroll strip, near the top end of it.
At your sewing machine, lead with the log just sewn.
Sew the unit to the strip using a 1/4 inch seam along the right side of the strips.

Step 4e Trim the excess fabric. Open the units with the right sides up. Ensure that the first dark leg (3 on the block assembly diagram) is in the 12 o'clock position.
Finger press the seam toward the outer log.

Step 4f Now stitch the second dark log to the 9 o'clock position (4 on the block assembly diagram) of the center square/light log unit.
Choose a dark fabric strip (can be the same print fabric strip or a different dark strip). Place it, vertically right side up onto your cutting mat.
Place center square/light log unit, right side down, on top of the jellyroll strip, near the top end of it.
At your sewing machine, lead with the log just sewn.
Sew the unit to the strip using a 1/4 inch seam along the right side of the strips.

Step 4g Trim the excess fabric. Open the units with the right sides up. Ensure that the second dark leg (4 on the block assembly diagram) is in the 9 o'clock position.
Finger press the seam toward the outer log.

This completes Round 1. Your log cabin quilt block should measure 6 1/2 inches square at this point.
Step 5a Repeat Steps 3a - 4g to stitch a second round (logs 5, 6, 7, and 8) of logs.
To start the second round of logs, choose a light fabric strip, different from those already used. Starting at the 6 o'clock position (5 on the block assembly diagram) stitch log 5 to the Round 1 logs. Trim. Finger press the seam toward the outer log.

Step 5b Choose a light fabric strip. Stitch the second light log of Round 2 to
the Round 1 logs at the 3 o'clock position (6 on the block assembly diagram). Trim. Finger press the seam
toward the outer log.

Step 5c Refer to above photo in Step 5b. Choose a dark fabric strip and stitch it to the Round 1 logs at the 12 o'clock position (7 on the block assembly diagram). Trim. Finger press the seam toward the outer log.
Step 5d Refer to above photo in Step 5b. Choose a dark fabric strip and stitch it to the Round 1 logs at the 9 o'clock position (8 on the block assembly diagram). Trim. Finger press the seam toward the outer log.
This completes Round 2. Your block should measure 10 1/2 inches square at this point.
Step 6 Repeat Steps 3a - 4g to add a third round of logs (numbers 9, 10, 11 and 12 on the log cabin quilt block assembly diagram). You will get a 14 1/2 inch log cabin block.

Step 7 Press the entire log cabin quilt block with an iron.
Here's a picture of the backside of the block. It show the seams pressed away from the center square.

Bonus Log Cabin Quilt Blocks
For both of the blocks below, two rounds of logs stitched around a 4 inch center square makes a 12 1/2 inch unfinished block (12 inch finished block).
The difference between the blocks is how the 4 inch center square is constructed: In Block 1 two (2 1/2 x 4 1/2 inch) strips are used and in Block 2 one charm square is used.
12 Inch Log Cabin Block No 1
To construct a 12 inch log cabin quilt block using only jelly rolls,
1 Make the center square by stitching two 2 1/2 x 4 1/2 inch strips together along the lengthwise edges to make a 4 inch finished size center square. I used two different fabrics with a white background and red print.
2 Then, stitch two rounds of 2 1/2 inch wide strips for logs around the center as shown in the above instructions.

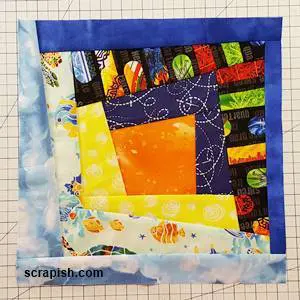
12 Inch Log Cabin Block No 2
Another option for making a 12 inch log cabin quilt block is to use a charm square (5 inch) as the center square.
1 Trim a charm square to 4 1/2 inches square.
2 Add two rounds of logs using 2 1/2 inch strips (jelly roll strips).
This results in a 12 1/2 inch (unfinished size) block.

As you can see using jelly rolls (2 1/2 inch strips) to make a log cabin block results in a big block pretty quickly.
You might like these
Courthouse Steps Quilt Block Pattern Tutorial
See step-by-step how a courthouse steps quilt block pattern is stitched. It's a great companion block to use with star quilt blocks.
Log Cabin Quilt Pattern - Free and Easy!
This log cabin quilt pattern has a traditional straight setting. Use 2 1/2 inch strips for quick, big blocks at 14 1/2 inches, unfinished!
Wonky Log Cabin Block Pattern Tutorial for Beginners
The wonky log cabin block is so much fun! And oh so easy for a beginner. Some call it a crazy log cabin quilt block...

Subscribe to the Quilt Blocks Digest newsletter for updates, special offers & exclusive content!
You will receive an email asking you to confirm your consent to subscribe. You must click on the confirmation link contained in that email in order to be subscribed and receive emails.
Your email address is never shared. Unsubscribe any time.
Recent Tutorials
-
Double Friendship Star Quilt Block Tutorial
Apr 05, 26 10:35 PM
 The double friendship star quilt block is easy to make. See step-by-step how and get fabric requirements for five sizes including 12 inch and bigger!
 -
Courthouse Steps Quilt Block Pattern Tutorial
Oct 23, 22 02:11 PM
See step-by-step how a courthouse steps quilt block pattern is stitched. It's a great companion block to use with star quilt blocks. -
Churn Dash Quilt Block Pattern Tutorial - 6 Inch, 9 Inch and 12 Inch
Jul 18, 22 07:11 PM
The churn dash quilt block looks difficult but is easy to piece. See step-by-step instructions with pictures. Get yardage for 3 sizes!

