Subscribe to the Quilt Blocks Digest newsletter for updates, special offers & exclusive content!
- Home
- Quilt Patterns
- Maple Leaf Quilt
Maple Leaf Quilt Pattern Tutorial
Easy for Beginners!
The Maple leaf quilt is a classic, traditional quilt pattern. See how to make it more modern. Get free step-by-step instructions for faster quilting!

This modern Maple leaf quilt design uses 12 inch blocks separated by 2 inch sashing between the blocks and rows. A variety of mottled fall colored fabrics are used to make the Maple leaf blocks. The borders are 6 inches wide.
What makes it modern? The use of a single color for the entire leaf and no cornerstones or obvious borders.
- Block Name: Maple Leaf Block
- Block Finished Size: 12 inch
- Setting: 5 x 6 blocks, 2 inch sashing between blocks and rows
- Borders: 6 inches
- Quilt Finished Size: 80 x 94 inches, approximate
Half Square Triangles
This quilt pattern uses a lot of half square triangles (HSTs) - 120 to be exact. But, I have a solution to making them faster.
Use strips and a HST ruler to make the half square triangles.
It's faster and easier than making half square triangles from squares. And, it uses a little less fabric. Now, what more could you ask for? Have fun!
Yardage Requirements for Quilt Top and Binding
These yardage requirements are based on 40 inches usable width of fabric, rounded up to the nearest 1/4 yard:
- Fabric A 3/4 yard (medium mottled orange)
- Fabric B 1/2 yard (medium red)
- Fabric C 1/2 yard (dark wine red)
- Fabric D 1/2 yard (light green)
- Fabric E 1 1/4 yard (dark green: 1/2 yard for blocks, 3/4 yard for binding)
- Fabric F 1/2 yard (light brown)
- Fabric G 1/2 yard (medium brown)
- Fabric H* 5 1/4 yards (golden yellow) (background)
*Assumes that you will piece long sashing and border strips.
Cutting Instructions for Quilt Top
WOF: width of fabric - HSTs: half square triangles
From Fabric A (6 blocks) cut:
- 2 (4 1/2 inch x WOF) strip for HSTs (using a half square triangle ruler)
- 3 (4 1/2 inch x WOF) strips; subcut 18 (4 ½ inch) plain leaf squares
- 2 (1 inch x WOF) strip; subcut 6 (1 inch x 9 inch) strips for stems
From Fabrics B - G (6 different fabrics, 4 blocks each) cut:
- 1 (4 1/2 inch x WOF) strip for HSTs (using a half square triangle ruler)
- 2 (4 1/2 inch x WOF) strips; subcut 12 (4 1/2 inch) plain leaf squares
- 1 (1 inch x WOF) strip; subcut 4 (1 inch x 9 inch) strips for stems
From Fabric H (background) cut:
- 8 (4 1/2 inch x WOF) strips for HSTs using a half square triangle ruler
- 4 (4 1/2 inch x WOF) strips for plain squares; subcut 30 (4 1/2 inch) plain background squares
- 4 (5 inch x WOF) strips for stem squares; subcut 30 (5 inch) stem squares
- 8 (2 1/2 inch x WOF) strips; subcut 24 (2 1/2 inch x 12 1/2 inch) strips for sashing between blocks
- 9 (2 1/2 inch x WOF) strips for long sashing between rows
- 9 (6 1/2 inch x WOF) strips for borders
As you cut your fabric stack and label what each stack is to be used for. This will help you to keep the pattern pieces organized and ready for use when called for in the instructions.
Backing, Binding, Batting Fabrics
- Backing: 3 yards of 108 inch wide backing fabric
- Binding: Fabric E (dark green): cut 9 (2 1/2 inch x WOF) strips
- Batting: prepackaged queen size (or at least 88 inches X 102 inches)
Maple Leaf Quilt Pattern Instructions
All seams are 1/4 inch unless otherwise noted.
Make Maple Leaf Blocks
This Maple leaf quilt has 30 leaf blocks. Each uses 4 HSTs, 1 stem unit, 3 plain leaf squares and 1 plain background square. Make the Maple leaf quilt blocks in the following quantities using the designated fabrics:
- Block A: make 6 from Fabrics A (medium mottled orange) and H (golden yellow)
- Block B: make 4 from Fabrics B (medium red) and H (golden yellow)
- Block C: make 4 from Fabrics C (dark wine red) and H (golden yellow)
- Block D: make 4 from Fabrics D (light green) and H (golden yellow)
- Block E: make 4 from Fabrics E (dark green) and H (golden yellow)
- Block F: make 4 from Fabrics F (light brown) and H (golden yellow)
- Block G: make 4 from Fabrics G (medium brown) and H (golden yellow)
Step 1a Cut Half Square Triangles.
Block A: Pair one Fabric A (4 1/2 inch x WOF) and one Fabric H (4 1/2 inch x WOF) strip and using half square triangle ruler cut 16 HSTs. Repeat with a second pairing to cut 8 HSTs for total of 24 HSTs.
Follow these step-by-step instructions with pictures to make HSTs with a half square triangle ruler.
Blocks B through G: Pair one Fabric A - G (4 1/2 inch x WOF) and one Fabric H (4 1/2 inch x WOF) strip. Use a half square triangle ruler to cut 16 HSTs.

Step 1b Stitch Half Square Triangles. Stitch each HST. Trim the dog ear from each one. Press seams open.

Make Maple Leaf Block Stems
Step 2 Make Stem Units. Use the 30 (5 inch) stem squares and the 30 (1 inch x 9 inch) strips to make 30 stem units in the quantities and designated fabrics noted below. Follow these step-by-step instructions with pictures to make a stem for leaf blocks.
- Block A: make 6 stem units from Fabrics A and H
- Block B: make 4 stem units from Fabrics B and H
- Block C: make 4 stem units from Fabrics C and H
- Block D: make 4 stem units from Fabrics D and H
- Block E: make 4 stem units from Fabrics E and H
- Block F: make 4 stem units from Fabrics F and H
- Block G: make 4 stem units from Fabrics G and H

Assemble Maple Leaf Blocks
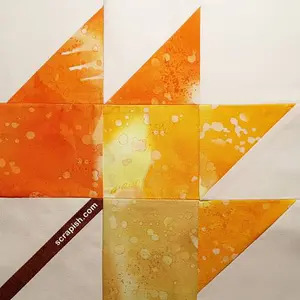
Step 3a Layout Blocks. Gather the HSTs, stem units, plain leaf squares and plain background squares and layout the maple leaf quilt blocks as shown in the picture below. Layout all of the leaves of one color at once to ensure that you have all the needed pieces.

Step 3b Stitch Units of Rows Together. Row by row with right sides together, stitch together the units. Press the seams... Rows 1 and 3: Press seams towards center. Row 2: Press seams away from center.

Step 3c Stitch Rows Together. With right sides together, nest the seams and stitch the rows together. Press the seams... Between Rows 1 and 2, press the seam up toward Row 1. Between Rows 2 and 3, press the seam down toward Row 3.

Maple Leaf Quilt Assembly Diagram
Refer to the Quilt Assembly Diagram below for Steps 4 through 8.
Assemble Maple Leaf Quilt
Step 4 Layout Blocks. On a design board, floor space, table or other area large enough to accommodate the quilt top arrange the Maple leaf blocks according to the diagram or as desired.
 Maple leaf quilt assembly diagram
Step 5 Stitch Sashing to Blocks. Rows 1 through 6: With right sides together, stitch a Fabric H (2 1/2 x 12 1/2 inch) sashing strip to the right-hand side of blocks 1 through 4 (block 5 does not have a right-hand side sashing strip). With right sides together, stitch Block 5 to Block 4 Sashing.
Note: Cutting/Piecing Long Strips. The exact measurements for the long sashing and border strips are given. To account for variations that can occur in cutting and stitching, I suggest that you piece each long sashing and border strip a little longer than the specified lengths and trim to size after attaching the long sashing strip to the rows and the border strips to the main quilt body.
Step 6a Make Long Sashing Strips (2 ½ inches x 68 1/2 inches). Trim selvage ends from Fabric H 9 (2 ½ inch x WOF) strips, leaving a straight edge. With right sides together, stitch two of these long strips together, short end to short end, to make the the sashing strips to go between the rows. Press seam to one side.
Step 6b Stitch Sashing To Rows. With right sides together stitch Row 1 Sashing strip to Row 1. Trim sashing strip even with row, removing excess fabric. Save excess to piece together the last long sashing strip.
Repeat for Rows 2 through 5 (Row 6 does not have a bottom sashing strip).
For the steps below, refer to the above 8 Point Star quilt pattern quilt assembly diagram.
Step 7 Stitch Row/Sashing Units Together. With right sides together, stitch Row 2 to Sashing 1. Flip Row2/Sashing2 Unit right side up and stitch Row 3 to Sashing 2.
Repeat for Row/Sashing Units 4 and 5.
Stitch Row 6 to Sashing 5.
Press the seams between the rows down toward the bottom of quilt top.
Step 8 Stitch Borders to Main Quilt Body.
Borders 1 and 2: (6 1/2 inch x 68 1/2 inch), Borders 3 and 4: (6 1/2 inch x 94 1/2 inch)
Step 8a Trim selvage ends from the Fabric H 9 (6 1/2 inch x WOF) strips for borders, leaving a straight edge.
Step 8b Border 1: With right sides together, stitch together two of these long strips short end to short end, to make one Border 1 strip. Press seam to one side. With right sides together stitch Border 1 strip to top of main quilt body. Trim border strip even with main quilt body, removing excess fabric.
Step 8c Border 2: Repeat Step 8b , stitching it to bottom of main quilt body.
Step 8d Border 3: With right sides together, stitch three of these long strips short end to short end, to make one Border 3 strip. Press seams to one side. With right sides together stitch Border 3 strip to left side of main quilt body. Trim border strip even with main quilt body, removing excess fabric. Save leftover excess fabric to piece together with the strips for Border 4.
Step 8e Border 4: Repeat Step 8d by stitching together the two remaining (6 1/2 inch x WOF) strips and the leftover excess fabric from Border 3. Stitch the strip to right side of main quilt body.
Your Maple leaf quilt top is done!
Finishing Maple Leaf Quilt Pattern
Assemble Quilt Sandwich
Step 9 Make Quilt Sandwich. Use a lint roller to pick up any loose threads or bits of fabric from the quilt top. Trim any fraying fabric edges. Press the entire quilt top.
Put the Maple leaf quilt sandwich together by layering in this order: backing, batting and quilt top. Pin baste the three layers together.
Quilt the Quilt
Step 10 Quilt the three layers together. I suggest a straight line quilting grid pattern of diagonal lines, first going from left to right and then going from right to left of the quilt. Make the grid lines about 2 inches apart. If you know how to free-motion quilt go for it! Or send quilt top out to a longarm quilting service.
Bind the Quilt
Step 11 Bind the Quilt. From the Fabric E (dark green) 3/4 yards cut 9 (2 1/2 inch x WOF) strips, trim selvages and join to make a single long binding strip. Fold in half lengthwise. Iron. Attach binding to quilt.
Maple Leaf Quilt by Visitor
This a photo of a quilt top stitched by visitor Natalie K. from an early version of this Maple leaf quilt pattern. She chose to do scrappy Maple leaf blocks. Just lovely!
 scrappy maple leaf quilt top
Here's a photo of the finished quilt.

And here's Natalie, a beginner quilter, wrapped in her beautiful Maple leaf quilt. You can see the straight line quilting done on the diagonal across the entire quilt. Great job Natalie...Thanks for sharing!

You might like these
Fall Leaf Quilt Block Tutorial
The fall leaf quilt block is easy for beginners - use HSTs. See a size chart to make it in three sizes. You may favor it over the Maple leaf.
Maple Leaf Quilt Pattern Table Runner
Free maple leaf quilt pattern done as a table runner using a 9 inch maple leaf quilt block. It's so easy to make!
Maple Leaf Quilt Block Pattern Tutorial - Traditional
The maple leaf quilt block (aka autumn leaf) is an easy nine patch block. See how to make it and get a cutting chart for 6, 9 and 12 inch blocks!

Subscribe to the Quilt Blocks Digest newsletter for updates, special offers & exclusive content!
You will receive an email asking you to confirm your consent to subscribe. You must click on the confirmation link contained in that email in order to be subscribed and receive emails.
Your email address is never shared. Unsubscribe any time.
Recent Tutorials
-
Double Friendship Star Quilt Block Tutorial
Apr 05, 26 10:35 PM
 The double friendship star quilt block is easy to make. See step-by-step how and get fabric requirements for five sizes including 12 inch and bigger!
 -
Courthouse Steps Quilt Block Pattern Tutorial
Oct 23, 22 02:11 PM
See step-by-step how a courthouse steps quilt block pattern is stitched. It's a great companion block to use with star quilt blocks. -
Churn Dash Quilt Block Pattern Tutorial - 6 Inch, 9 Inch and 12 Inch
Jul 18, 22 07:11 PM
The churn dash quilt block looks difficult but is easy to piece. See step-by-step instructions with pictures. Get yardage for 3 sizes!


