Subscribe to the Quilt Blocks Digest newsletter for updates, special offers & exclusive content!
- Home
- Other Quilt Blocks
- Fall Leaf
Fall Leaf Quilt Block Tutorial
The fall leaf quilt block is easy for beginners - use HSTs to make it. See a size chart for three popular sizes. Maple leaf, move over. A new leaf is in town!

Half Square Triangle Ruler
When making lots of half square triangles (HSTs) at once I prefer to use a half square triangle ruler to make them.
Using a HST ruler is a great time saver when making several blocks at a time. There are no lines to draw. And, you only have to trim one dog ear.
Follow the instructions given with your particular type of HST ruler.
Note: When the instructions below direct you to make HSTs for the block, a link refers you to a page with step by step instructions on making HSTs using a HST ruler.
Block Size Cutting Chart
8 inch fall leaf block
- 6 (2 inch finished size, 2 1/2 inch unfinished) half square triangles
- 3 (2 1/2 inch) print squares
- 3 (2 1/2 inch) plain squares
- 1 (5 inch) plain square
- 1 (1 inch x 9 inch) strip
12 inch fall leaf block
- 6 (3 inch finished size, 3 1/2 inch unfinished) half square triangles
- 3 (3 1/2 inch) print squares
- 3 (3 1/2 inch) plain squares
- 1 (7 inch) plain square
- 1 (1 inch x 11 inch) strip
16 inch fall leaf block
- 6 (4 inch finished size, 4 1/2 inch unfinished) half square triangles
- 3 (4 1/2 inch) print squares
- 3 (4 1/2 inch) plain squares
- 1 (9 inch) plain square
- 1 (1 inch x 13 inch) strip
Block Fabric Designations
I used three different dark orange print fabrics and a dark gray fabric as the background to make this quilt block:
- Fabric A – dark orange plus sign
- Fabric B – dark orange star
- Fabric C – dark orange hash marks
- Fabric D – dark gray background
Fall Leaf Quilt Block Instructions
WOF= Width Of Fabric
Unless otherwise noted seams are 1/4 inch.
Refer to the Block Size Cutting Chart above for desired block size.
Step 1 Pair one strip each of Fabrics A and D, B and D, and C and D. Use a HST ruler to cut 2 half square triangles from each set for a total of 6. Stitch each set along its diagonal edge to make half square triangles.
Note: See these instructions to make half square triangles from strips or refer to these instructions to make half square triangles from squares.

Step 2 From Fabrics A – C cut print squares. From fabrics the cut plain square.

Step 3 From Fabrics C and D make the stem unit. See these detailed step by step instructions for making a stem for leaf quilt blocks. Press the seams away from center.

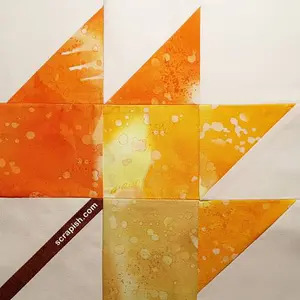
Step 4 Layout the patches and patch units for your fall leaf quilt block as shown in the picture below. With the exception of the stem unit press all seams open.

Stitch the Patches and Units of Each Row Together
Step 5 Row 1: With right sides together, place the unit from Column 2 on top of the unit in Column 1. Align the edges. Stitch a seam along the right edge. Repeat for the units in Columns 3 and 4. Press seams open.

Step 6 Row 2: Repeat Step 5.

Step 7a Row 3: With right sides together, place the HST from Column 4 on top of the plain square in Column 3. Align the edges. Stitch a seam along the right edge. Press seam open.
Step 7b Row 4: With right sides together, place the plain square from Column 4 on top of the HST in Column 3. Align the edges. Stitch a seam along the right edge. Press seam open.

Stitch the Rows Together
Step 8 Stitch Row 2 to Row 1: With right sides together, place Row 2 on top of Row 1. First match the middle seams. Then match the two outer seams. Stitch 1/4 inch seam. Press row seam open.

Step 9 Stitch Row 4 to Row 3, matching the center seam. This makes a four patch. Press seam open.

Step 10 With right sides together stitch the four patch to the stem unit along the right side.
Press seam open.

Step 11 Stitch Row 3 to Row 2. Match the middle seams first. Then the outer seams. Press row seam open.

Your fall leaf quilt block is finished! Personally, I think this it has a modern graphic appeal. For me it definitely rivals the Maple leaf quilt block. What do you think? :-)
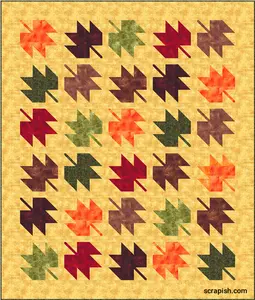
Fall Leaf Quilt Pattern Idea
Here's what the fall leaf quilt block would look like in a quilt. An 8 inch block size is used alternating with 8 inch plain squares.
This quilt pattern is 88 x 88 inches (9 blocks per row by 9 rows). It uses 25 fall leaf quilt blocks and 20 plain squares. The alternating rows and borders are 8 inches wide.

Give this fall leaf quilt pattern a try. It's very easy for beginners! For a scrappy look make the blocks in multiple fall colors including yellow, wine, light orange, gold or a shade of mottled green.
You might like these
Free Maple Leaf Quilt Pattern - Easy for Beginners!
Who doesn't love a Maple leaf quilt? It's a classic, traditional quilt pattern. See how to make it more modern. Free step-by-step instructions!
Maple Leaf Quilt Pattern Table Runner
Free maple leaf quilt pattern done as a table runner using a 9 inch maple leaf quilt block. It's so easy to make!
Maple Leaf Quilt Block Pattern Tutorial - Traditional
The maple leaf quilt block (aka autumn leaf) is an easy nine patch block. See how to make it and get a cutting chart for 6, 9 and 12 inch blocks!

Subscribe to the Quilt Blocks Digest newsletter for updates, special offers & exclusive content!
You will receive an email asking you to confirm your consent to subscribe. You must click on the confirmation link contained in that email in order to be subscribed and receive emails.
Your email address is never shared. Unsubscribe any time.
Recent Tutorials
-
Double Friendship Star Quilt Block Tutorial
Apr 05, 26 10:35 PM
 The double friendship star quilt block is easy to make. See step-by-step how and get fabric requirements for five sizes including 12 inch and bigger!
 -
Courthouse Steps Quilt Block Pattern Tutorial
Oct 23, 22 02:11 PM
See step-by-step how a courthouse steps quilt block pattern is stitched. It's a great companion block to use with star quilt blocks. -
Churn Dash Quilt Block Pattern Tutorial - 6 Inch, 9 Inch and 12 Inch
Jul 18, 22 07:11 PM
The churn dash quilt block looks difficult but is easy to piece. See step-by-step instructions with pictures. Get yardage for 3 sizes!


