Subscribe to the Quilt Blocks Digest newsletter for updates, special offers & exclusive content!
- Home
- Other Quilt Blocks
- Sailboat
Sailboat Quilt Block Pattern Tutorial
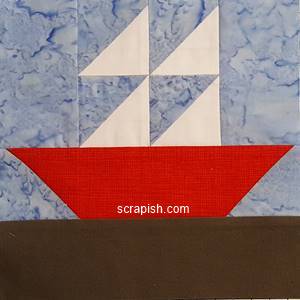
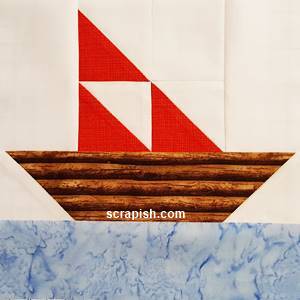
The 12 inch sailboat quilt block pattern can be used in a baby quilt or flip the HSTs to piece an underground railroad sailboat block. See how!
This block is easy to make. It uses a stitch and flip quilting method to turn squares and rectangles into a boat shape.
A variation of the sail boat quilt block has a storied history. It is told that it was used in quilts to help slaves along the Underground Railroad. (Fact or fiction? I don't know, but I'd like to think it's true.)
Maybe it served as a symbol of hope.
Reportedly, when US slaves saw this block in a quilt hanging on a clothes line they knew that a waterway was nearby or that a boat was available.
Both could whisk them away on the sometimes treacherous journey to freedom, usually Canada.
Danger lurked around almost every corner for both slaves and the people who assisted them on the path to freedom.
Just imagine what the person who saw this quilt block, seemingly so innocuous, must have felt. Yes, I would say hopeful.
Let's see how to make it.
Fabric and Block Measurements
In this tutorial I have used 4 fabrics and designated the fabrics as follows:
Fabric A = sails (white)
Fabric B = sky (blue)
Fabric C = water (brownish grey)
Fabric D = boat (red)
Here are the unit cutting measurements to make an 8 inch and 12 inch sailboat block.
Simply choose your block size and follow the instructions below to make the block.
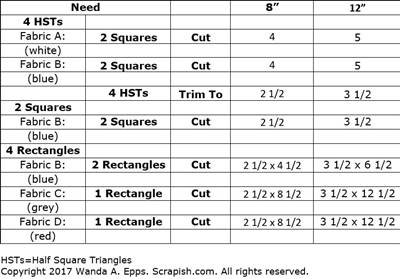 sailboat block measurement chart
(Note: To increase photo size, on your keyboard hold 'Ctrl' and hit the + key.)
Block Layout
This is a 4 patch block and is laid out on a grid of 4 rows and 4 columns. The rectangles cover two rows and are attached to two separate rows of squares.
Finished block sizes that are evenly divisible by four - 8, 12, 16 inch finished block sizes - will be the easiest quilt block to make.
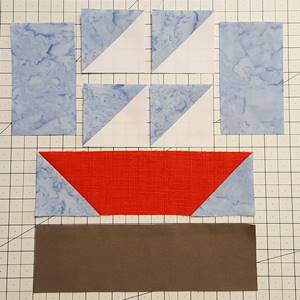 sailboat block 4 patch grid
The 8 units that make up the block are
- 2 rectangles, vertical
- 4 half square triangles (aka HSTs)
- 2 triangles and 1 wedge
- 1 rectangle, horizontal
Sailboat Quilt Block Pattern Instructions
Step 1 Make HSTs
According to measurement chart above cut 2 squares from fabric A (white) and 2 squares fabric B (blue).
Make 4 half square triangles.
Press the seams open or towards the darker fabric.
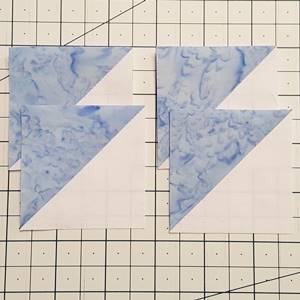 4 half square triangles
Step 2a Make Boat
This step uses the stitch and flip method to make the boat shape.
According to measurement chart above...
Cut 2 squares from fabric B (blue) and cut 1 rectangle from fabric D (red).
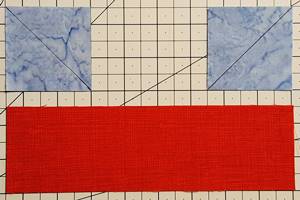
Step 2b
Sew on the drawn line (or a thread or two away from it) to attach the squares to the rectangle. If you sew a thread or two away from the line, stitch on the side of the line closest to bottom corner of the square.
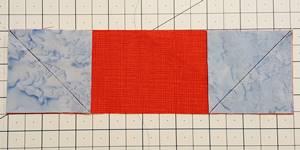
Step 2c
Place a 1/4 inch line of a ruler along the seam line and use a rotary cutter to cut away the bottom part of the triangle.
Repeat for the second end of the rectangle.
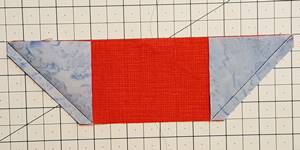
Step 2d
Flip remaining side of both squares down to reveal triangles. Finger press seams towards triangles.
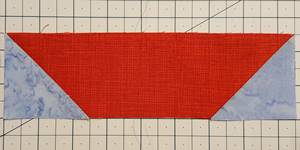
Step 3 Layout Block
Near your sewing machine layout, as pictured below, the block in the grid format.
 sailboat quilt block pattern layout
Step 4a Sew Top Half of Block Together
Without changing the orientation of the units sew the HSTs and rectangles of rows 1 and 2 together.
HSTs Row 1: With right sides together, place the half square triangle from row 1 column 3 on top of the half square triangle from row 1 column 2. Sew the units together using a 1/4 inch seam along the right side of the block units. Flip the 2nd HST open, right side up. Finger press the seam open.
HSTs Row 2: Repeat for the second set of half square triangles.
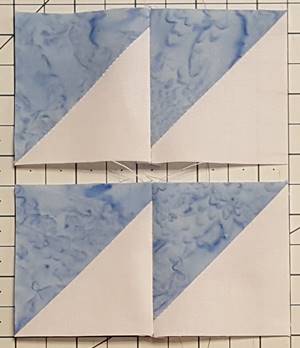
Step 4b
With right sides together place row 1 on top of row 2. The bottom of row 1 meets the top of row 2.
To get a perfectly aligned center match the points of the HSTs. Using a marker draw a line on the wrong side of the fabric where the points meet. Sew rows 1 and 2 together using a 1/4 inch seam, careful to stitch over the drawn line (even if it's not exactly 1/4 inch from the edge of the fabric). Usually, finger press the seam open.
To see the above done in step by step photos check out the pinwheel quilt block pattern tutorial.
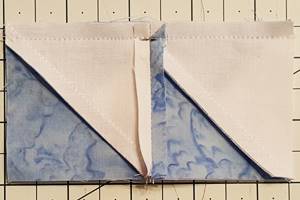 rows 1 and 2 sewn together
Step 4c
Perfectly aligned center!
Take the sewn rows to the ironing board and press the seams (not pictured).
Use a starch alternative pressing solution if desired.
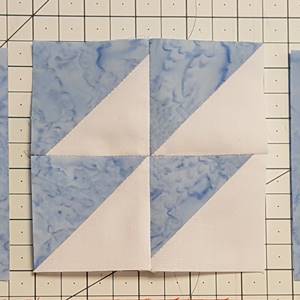
Step 4d Layout Block
Place the HSTs back in the block layout.
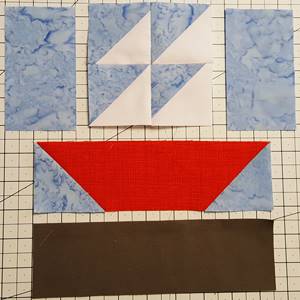
Step 5 Sew Rectangles to HSTs
Now sew the two side rectangles of the sailoat quilt block pattern to the HSTs.
With right sides together, place the left rectangle face down over the HSTS. Align edges along the long sides of both units. Sew together using a 1/4 inch seam
Repeat for the second side rectangle.
Finger press the seam toward the rectangles.
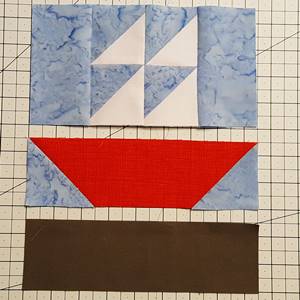
Step 6a Sew Row 4 to Row 3
With right sides together, place the bottom rectangle (water) face down over the boat rectangle unit of row 3.
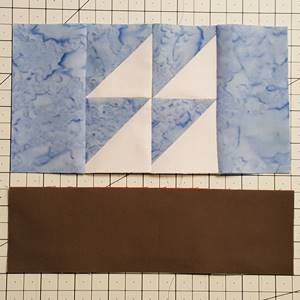
Step 6b
Sew rows 4 and 3 together using a 1/4 inch seam. Finger press the seam toward the bottom rectangle (water).
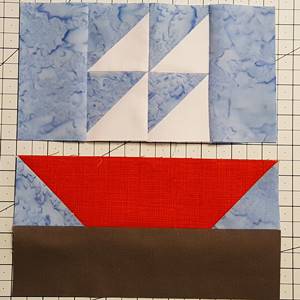
Step 7 Sew Bottom of Block to Top of Block
With right sides together, place the bottom half of the block (boat and water rectangles face down over the top half of the block (side rectangles and HSTs).
Sew together using a 1/4 inch seam. Finger press the seam toward the boat rectangle.
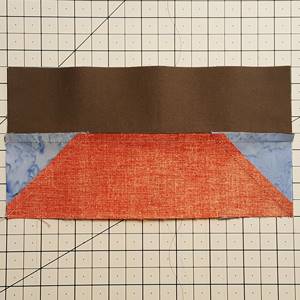
Step 8 Block Completed
Beautiful! Once the maple leaf quilt block is sewn together, take it to the ironing board and give it a final press.
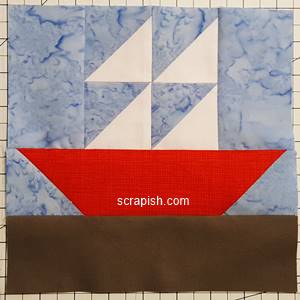 sailboat quilt block pattern finished
Here's the backside of the sailboat quilt block pattern. You can see how the seams are pressed. (Okay, I missed the mark on the seam between the row of the HSTs. I meant to press it open. If you do the same, just go with it - press the seam in the direction it wants to go.)
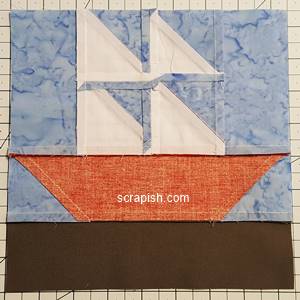 backside of block pattern
This completes the traditional sailboat quilt block pattern tutorial.
Underground Railroad Sailboat Quilt Block Pattern
To make an Underground Railroad sailboat quilt block pattern make a few changes.
The difference between the traditional sailboat quilt block and the Underground Railroad sailboat block is in the half square triangles that make up the sails and a portion of the sky.
In the traditional sailboat block there are four sails. These are made up of four half square triangles. One of the triangles of a HST represents the sky and the other represents a sail.
The triangles that represent the sky point upward to the left. The triangles that represent the sails point downward and to the right.
 traditional sailboat block HSTs traditional sailboat block HSTs |
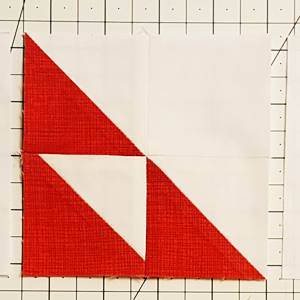 Underground Railroad sailboat block HSTs Underground Railroad sailboat block HSTs |
In the Underground Railroad sailboat quilt block there are three sails. Again, they are made up of half square triangles, but only three. What would be the fourth is a plain square.
The triangles that represent the sky point upward to the right. The triangles that represent the sails point downward to the left.
(Cut the plain square the same size as the trimmed half square triangle that you won't use. You can place this HST in your scrap pile and use it in another project.)
Now, see the Underground Railroad sailboat quilt block pattern.
When I was researching the Underground Railroad sailboat block I noticed that in all of the pictures that I saw (and I am sure I did not see all) the sky was done in a cream or white color. At the very least the sky was done in a very light color.
I did not see any commentary about this but my thinking is that it could represent a nighttime sky lit by the stars and moonlight.
Maybe this is due to the fact that travelers along the Underground Railroad did so mostly at night.
Another possibility is that it would be easier to see this color in a quilt hung outside at night.
Whichever version you choose to make have fun making the sailboat quilt block pattern.
Subscribe to the Quilt Blocks Digest newsletter for updates, special offers & exclusive content!
You will receive an email asking you to confirm your consent to subscribe. You must click on the confirmation link contained in that email in order to be subscribed and receive emails.
Your email address is never shared. Unsubscribe any time.
