Subscribe to the Quilt Blocks Digest newsletter for updates, special offers & exclusive content!
- Home
- Quilt Patterns
- Star Table Topper
Star Table Topper Quilt Pattern
Easy for Beginners!
This star table topper has a unique shape which you can orient in two ways. It's easy to make using the Tri ruler of any Tri Recs set of rulers!

The table topper is versatile and quick and easy to make. Make one for every holiday – Christmas, Halloween or patriotic holidays!
- Table Topper Finished Size: 17 1/2 x 17 1/2 inches, approximate
Tri Recs Set of Rulers
Use the Tri ruler of any Tri Recs combo set of rulers to cut the triangles for this table topper.
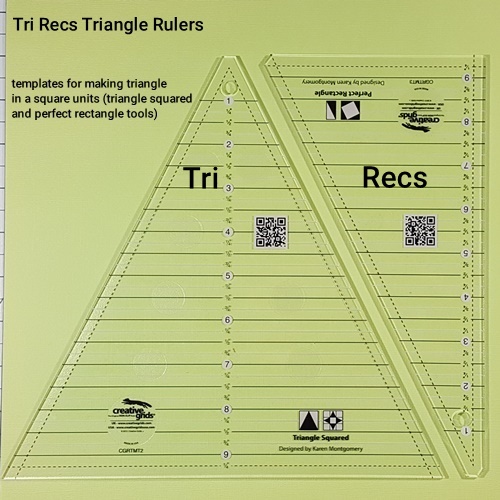
To see or learn how to use these rulers see the Triangle In a Square tutorial.
Yardage Requirements
- Fabric A: 1/4 yard (or scraps or fatquarter) (star, red print)
- Fabric B: 1 fatquarter (backing, gray print)
- Batting: 18 x 18 inch
- Binding: None (self-binding)
Cutting Instructions for Quilt Top
WOF: width of fabric
From Fabric A (star) cut 1 (6 1/2 inch x WOF) strip or 1 (6 1/2 inch x 29 inch) strip from scraps or 2 (6 1/2 inch x WOF) strips from fatquarters :
- subcut 1 (6 1/2 x 6 1/2 inch) square
- subcut 4 (6 1/2 inch) triangles using a Tri triangle ruler
From Fabric B (backing) cut:
- 1 (18 x 18 inch) square
Star Table Topper Quilt Pattern Instructions
All seams are 1/4 inch unless otherwise noted.
Cut Triangles
Step 1a From Fabric A cut 4 (6 1/2 inch) triangles using a Tri triangle ruler (see cutting instructions above. To see or learn how to use the ruler see the Triangle In a Square tutorial.
 triangles using a Tri triangle ruler.")
Step 1a Mark the center of the triangles along their base (the side opposite the tip) by folding each triangle in half along its base and pressing a crease into the fold.

Cut Square
Step 2 From Fabric A cut 1 (6 1/2 inch) square using a square or other quilting ruler.
Mark the center of each side of the square by folding it in half vertically once and press a crease into the top and bottom of the fold.
Unfold and re-fold the square in half horizontally once and press a crease into the top and bottom of the fold.

Assemble Table Topper Quilt Top
Step 3a Place the base of one triangle along the top edge of the square, matching the centers. Stitch a 1/4 inch seam. Repeat for the opposite side of the square. Press the seams toward the triangles.

Step 3b Rotate the sewn square/triangle unit 90 degrees. Repeat step 3a for the 2 remaining two sides of the square.

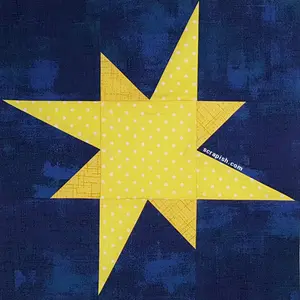
Your star table topper quilt top should resemble the picture below if you orient two of the star points north and south.

You can also orient the star with the points pointing in the four corners of a square.

Make the Quilt Sandwich
Step 4 Layer this order: batting, backing fabric (right side up), star table topper quilt top (right side down) .
, star table topper quilt top
(right side down) in that order.")
Step 5 Use a walking foot to stitch the layers together along the inside perimeter of the star using a 1/4 inch seam away from the star's edge. Leave an un-stitched opening large enough for your hand to fit through (marked by blue lines).

Step 6 Cut out the star. Use a rotary cutter and ruler, or scissors, to cut along the outside perimeter of the star cutting through the backing fabric and batting.

Step 7 Turn the star table topper inside out. Place your hand through the opening and pull the fabric inside out.
Run a wooden turning tool, retractable ink pen, knitting needle or chopstick along the inside seam to un-bunch the fabric and shape the star table topper. Push the star tips out as far as you can without punching through the fabric.

If necessary, from the right side of the fabric use a quilting pin to pick the star points out as far as you can. When you are done the seams should be pretty even and the backing fabric does not show when viewing the topper from the front. The same is true if viewing the topper from the back. The front fabric should not show from the back.
Step 8 Turn the edges of the opening under 1/4 inch, or even with sewn edges, and press in place.

Quilt the Star Table Topper
Step 9a Use a walking foot to stitch around the perimeter of the star about 1/8 of an inch in from the edge. This will close and secure the opening, help the outer seams to lie flat and quilt the top to the backing fabric.

Step 9b Place the edge of your walking foot against the previously stitched line (see photo above). Stitch four additional quilting lines (see photo below) 1/4 inch in from the previously stitched line following the outline of the star.

Your star table topper is complete! The above photo shows the back with the quilting lines clearly visible. See what you can create with one simple tool. :-)
Straight Line Quilting Designs
See this article for more about straight line quilting designs.
To Make a Larger Table Topper
To create a larger star table topper use the 9 1/2 inch measurement line on the Tri ruler. You will need about 3/8 yard of Fabric A to cut 1 (9 1/2 inch x W0F) strip and subcut your triangles and square from it.
For the backing fabric and batting you'll need about 27 inch x 27 inch square of each. Your finished table topper should measure about 26 1/2 inches x 26 1/2 inches when the star points point north and south.
You might like these
Galaxy Star Quilt Block Variation Pattern Tutorial - An Uneven Star
Unlike the galaxy star quilt block, a variation of it is quick and easy. Find out the basic rulers used to make this uneven star. You may already have them!
Eight Pointed Star Quilt Block Pattern Tutorial - Easy for Beginners!
This easy eight pointed star quilt block pattern uses triangle in a square units as star points. It's easy to make using Tri Recs rulers!
Triangle In a Square Quilt Block Tutorial Using Tri Recs Rulers
The triangle in a square unit... Small for star blocks, large for a standalone quilt block. See how to use tri recs triangle rulers to make it. Easy!

Subscribe to the Quilt Blocks Digest newsletter for updates, special offers & exclusive content!
You will receive an email asking you to confirm your consent to subscribe. You must click on the confirmation link contained in that email in order to be subscribed and receive emails.
Your email address is never shared. Unsubscribe any time.
Recent Tutorials
-
Double Friendship Star Quilt Block Tutorial
Apr 05, 26 10:35 PM
 The double friendship star quilt block is easy to make. See step-by-step how and get fabric requirements for five sizes including 12 inch and bigger!
 -
Courthouse Steps Quilt Block Pattern Tutorial
Oct 23, 22 02:11 PM
See step-by-step how a courthouse steps quilt block pattern is stitched. It's a great companion block to use with star quilt blocks. -
Churn Dash Quilt Block Pattern Tutorial - 6 Inch, 9 Inch and 12 Inch
Jul 18, 22 07:11 PM
The churn dash quilt block looks difficult but is easy to piece. See step-by-step instructions with pictures. Get yardage for 3 sizes!


