Subscribe to the Quilt Blocks Digest newsletter for updates, special offers & exclusive content!
- Home
- How to Quilt
- Square in a Square
Square in a Square Tutorial for Beginners
A square in a square is surrounded by triangles to set a square block on point. The math formula is given but for convenience a Block Size Cutting Chart is provided.

Stitch and Flip Quilting Technique
The stitch and flip quilting technique is used to replace the four corners of a square, making a square-in-a-square. The result is that the inner square is set on point and, once completed, the entire unit is the same size as the starting larger square.
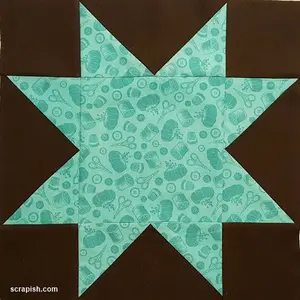
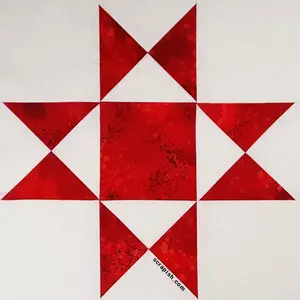
Sometimes called a diamond in a square, a square-in-a-square unit is used in lots of quilt blocks. This Ohio star variation is one example.

Stitch and Flip Math
To make the center unit like in the star block above you start with a large center square and four smaller squares. The smaller squares are half the finished size of the larger square plus a half inch for seam allowance.
smaller squares = half the finished size of larger square plus 1/2 inch
Or expressed another way
smaller squares = finished size of larger square / 2 + 1/2
For example, if you want a 4 inch finished size unit cut one 4 1/2 inch large square and 4 (2 1/2 inch) small squares (4 / 2 = 2 + 1/2 = 2 1/2).
The stitch and flip technique is easy to master. And some say the basic math is too but a size cutting chart is shown after the instructions.
Refer to the Block Size Cutting Chart for the block or unit size you want to make.
Square in a Square Instructions
Step 1 Cut one large square from Fabric A (center square). Cut 4 small squares from Fabric B (background).
. Cut 4 small squares from Fabric B (background).")
I am demonstrating a 4 inch finished size unit. My large square is cut at 4 1/2 inches and my small squares are cut 2 1/2 inches.
Step 2 Draw a line from corner to corner down the diagonal center of all the small squares.

Step 3 With the right sides together, place a small square in two opposite corners of the larger square (Fabric A) and pin in place.
 and pin in place.")
Step 4a Stitch on the drawn line on the small squares.

Step 4b Place the 1/4 inch measurement line of a quilting ruler along the seam line of one small triangle. Use a rotary cutter and cut along the ruler's edge to cut away the corner of the unit. Rotate the unit and repeat to cut the opposite corner.

Step 4c When you finish clipping the first two corners the unit looks like this...

Step 4d Flip what remains of the small squares right side up to reveal the new corners which are now triangles. Press the seams towards the triangles.

Step 5a With the right sides together, place a small square in the remaining two opposite
corners of the larger square (Fabric A) and pin in place. Stitch on the drawn line on the small squares. Your stitching lines will overlap the previously stitched on triangles.

Step 5b Place the 1/4 inch measurement line of a quilting ruler along the seam line of one small triangle. Use a rotary cutter and cut along the ruler's edge to cut away the corner of the unit. Rotate the unit and repeat to cut the opposite corner.

Step 5c Now the unit looks like this...

Step 5d Flip what remains of the small squares right side up to reveal the square in a square unit. Press the seams towards triangles.

How to Square Up a Square in a Square Quilt Block
Using this method to make a square in a square unit requires very little, if any, trimming or squaring up.
To start, position the unit so that the inner square is on point. To square up the unit, divide the unfinished size in half. Place this measurement line of a quilting ruler on the vertical center of the unit.
I am demonstrating a 4 1/2 inch unfinished unit. My measurement line to use to square the unit is the 2 1/4 inches (4 1/2 divided by 2 = 2 1/4). Before trimming...

check each point on the inner square to ensure that it has a 1/4 inch seam allowance (indicated by the green lines). Trim the unit if necessary.
. Trim the unit if necessary.")
Diamond in a Square: Cut Corners Before Stitching
If you're like me you get tired of drawing lines on squares, especially to make a lot blocks for a quilt pattern. So, I usually clip the corners instead of marking lines before I stitch.
I use the 1/4 inch measurement line of a quilting ruler or the Folded Corner Clipper tool by Creative Grids (R).
Step 1 Place the small squares right sides together with the large square as in Step 3 above. Step 2 Place the 1/4 inch measurement line (for clarity this is indicated by the green line) along the diagonal center of a small square and cut along the ruler's edge. This leaves the 1/4 inch seam allowance. Pin if desired.

Step 3 Stitch a 1/4 inch seam. Flip the corners right side up. Press the seams towards the triangles.

Step 4 Repeat Step 2 for the remaining two corners of the large square. Stitch a 1/4 inch seam.

Step 5 Flip the triangles right side up and press the seams toward the triangles, revealing the square in a square unit.

That's it. The square in a square, or diamond in a square, unit is complete!
Square In a Square Block Size Cutting Chart
|
Square In a Square For Finished Size (inches) |
Cut 1 Large Square (inches) |
Cut 4 Small Squares (inches) |
Square Up Measurement (inches) |
|
2 3 4 5 6 7 8 |
2 1/2 3 1/2 4 1/2 5 1/2 6 1/2 7 1/2 8 1/2 |
1 1/2 2 2 1/2 3 3 1/2 4 4 1/2 |
1 1/4 1 3/4 1 1/4 2 3/4 3 1/4 3 3/4 4 1/4 |
You might like these
Star Quilt Block Pattern Tutorial - 12 Inch!
This easy star quilt block pattern (aka sawtooth star) makes an 8 point star using flying geese units and a square. Very beginner friendly!
Ohio Star Quilt Block Made Easy and Fast, Even for Beginners
Ohio star quilt block directions using a quarter square triangle ruler. No lines to mark and very little trimming makes making a quilt faster.
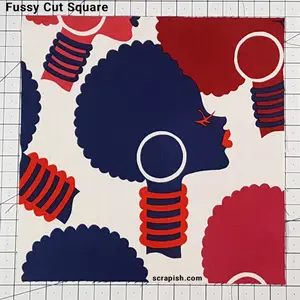
Fussy Cut Fabric for Quilting
Fussy cut - cutting a specific area of fabric - to frame or showoff a motif. See 2 ways of fussy cutting fabric and using the squares in quilt blocks.
Subscribe to the Quilt Blocks Digest newsletter for updates, special offers & exclusive content!
You will receive an email asking you to confirm your consent to subscribe. You must click on the confirmation link contained in that email in order to be subscribed and receive emails.
Your email address is never shared. Unsubscribe any time.
Recent Tutorials
-
Double Friendship Star Quilt Block Tutorial
Apr 05, 26 10:35 PM
 The double friendship star quilt block is easy to make. See step-by-step how and get fabric requirements for five sizes including 12 inch and bigger!
 -
Courthouse Steps Quilt Block Pattern Tutorial
Oct 23, 22 02:11 PM
See step-by-step how a courthouse steps quilt block pattern is stitched. It's a great companion block to use with star quilt blocks. -
Churn Dash Quilt Block Pattern Tutorial - 6 Inch, 9 Inch and 12 Inch
Jul 18, 22 07:11 PM
The churn dash quilt block looks difficult but is easy to piece. See step-by-step instructions with pictures. Get yardage for 3 sizes!


